RabbitMQ延迟队列(基于死性)
基本介绍
概念
所谓延时消息就是指当消息被发送以后,并不想让消费者立即拿到消息,而是等待指定时间后,消费者才拿到这个消息进行消费
延迟队列使用场景
- 订单在十分钟之内未支付则自动取消
⒉新创建的店铺,如果在十天内都没有上传过商品,则自动发送消息提醒。
-
用户注册成功后,如果三天内没有登陆则进行短信提醒。
-
用户发起退款,如果三天内没有得到处理则通知相关运营人员。
-
预定会议后,需要在预定的时间点前十分钟通知各个与会人员参加会议
这些场景都有一个特点,需要在某个事件发生之后或者之前的指定时间点完成某一项任务,如:发生订单生成事件,在十分钟之后检查该订单支付状态,然后将未支付的订单进行关闭;看起来似乎使用定时任务,一直轮询数据,每秒查一次,取出需要被处理的数据,然后处理不就完事了吗?如果数据量比较少,确实可以这样做,比如:对于“如果账单一周内未支付则进行自动结算”这样的需求,如果对于时间不是严格限制,而是宽松意义上的一周,那么每天晚上跑个定时任务检查一下所有未支付的账单,确实也是一个可行的方案。但对于数据量比较大,并且时效性较强的场景,如:“订单十的检查,同时会给数据库带来很大压力,无法满足业务要求而且性能低下。分钟内未支付则关闭“,短期内未支付的订单数摆可能合右很多迁动的问甘云人出A对.!只平一级别,对这么庞大的数据量仍旧使用轮询的方式显然是不可取的,很可能在一秒内无法完成所有订单
详细配置如下
 rabbitmq:
    addresses: 127.0.0.1:6605,127.0.0.1:6606,127.0.0.1:6705 #指定client连接到的server的地址,多个以逗号分隔(优先取addresses,然后再取host)
#    port:
    ##集群配置 addresses之间用逗号隔开
    # addresses: ip:port,ip:port
    password: admin
    username: 123456
    virtual-host: / # 连接到rabbitMQ的vhost
    requested-heartbeat: #指定心跳超时,单位秒,0为不指定;默认60s
    publisher-confirms: #是否启用 发布确认
    publisher-reurns: # 是否启用发布返回
    connection-timeout: #连接超时,单位毫秒,0表示无穷大,不超时
    cache:
      channel.size: # 缓存中保持的channel数量
      channel.checkout-timeout: # 当缓存数量被设置时,从缓存中获取一个channel的超时时间,单位毫秒;如果为0,则总是创建一个新channel
      connection.size: # 缓存的连接数,只有是CONNECTION模式时生效
      connection.mode: # 连接工厂缓存模式:CHANNEL 和 CONNECTION
    listener:
      simple.auto-startup: # 是否启动时自动启动容器
      simple.acknowledge-mode: # 表示消息确认方式,其有三种配置方式,分别是none、manual和auto;默认auto
      simple.concurrency: # 最小的消费者数量
      simple.max-concurrency: # 最大的消费者数量
      simple.prefetch: # 指定一个请求能处理多少个消息,如果有事务的话,必须大于等于transaction数量.
      simple.transaction-size: # 指定一个事务处理的消息数量,最好是小于等于prefetch的数量.
      simple.default-requeue-rejected: # 决定被拒绝的消息是否重新入队;默认是true(与参数acknowledge-mode有关系)
      simple.idle-event-interval: # 多少长时间发布空闲容器时间,单位毫秒
      simple.retry.enabled: # 监听重试是否可用
      simple.retry.max-attempts: # 最大重试次数
      simple.retry.initial-interval: # 第一次和第二次尝试发布或传递消息之间的间隔
      simple.retry.multiplier: # 应用于上一重试间隔的乘数
      simple.retry.max-interval: # 最大重试时间间隔
      simple.retry.stateless: # 重试是有状态or无状态
    template:
      mandatory: # 启用强制信息;默认false
      receive-timeout: # receive() 操作的超时时间
      reply-timeout: # sendAndReceive() 操作的超时时间
      retry.enabled: # 发送重试是否可用
      retry.max-attempts: # 最大重试次数
      retry.initial-interval: # 第一次和第二次尝试发布或传递消息之间的间隔
      retry.multiplier: # 应用于上一重试间隔的乘数
      retry.max-interval: #最大重试时间间隔
在默认情况下主要的配置如下
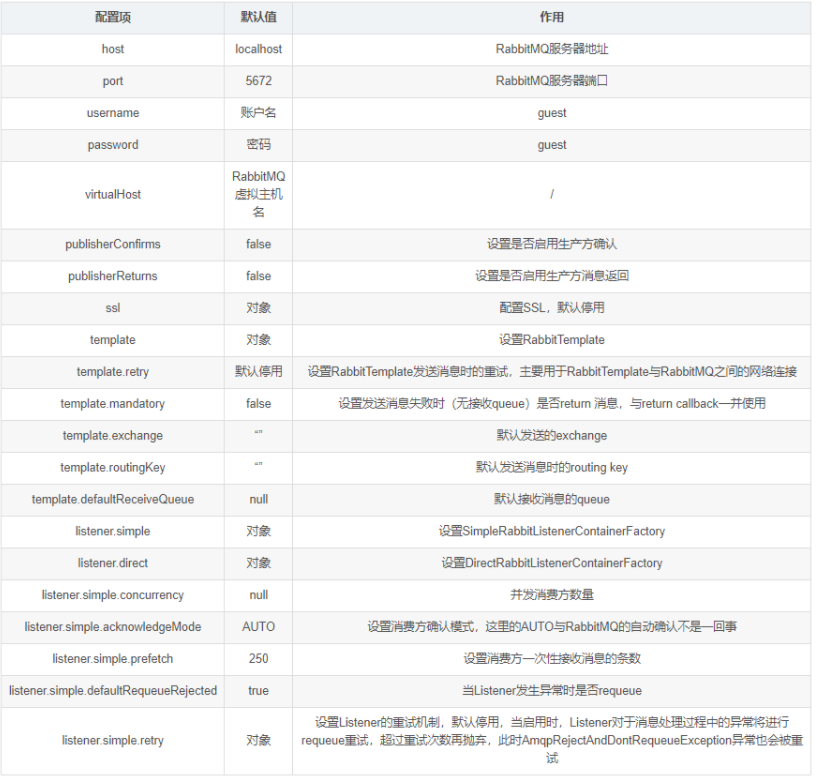
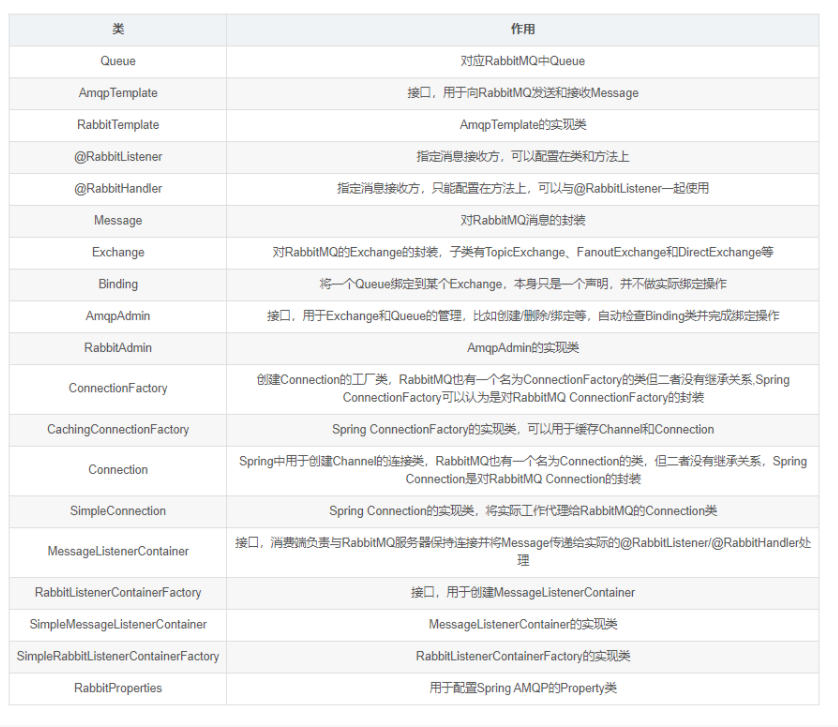
Spring AMQP的主要对象
RabbitMQ整合springboot
依赖pom,注:版本是2.5.7下的才支持swagger
    <dependencies>
        <!--启动器-->
        <dependency>
            <groupId>org.springframework.boot</groupId>
            <artifactId>spring-boot-starter</artifactId>
        </dependency>
        <!--test-->
        <dependency>
            <groupId>org.springframework.boot</groupId>
            <artifactId>spring-boot-starter-test</artifactId>
            <scope>test</scope>
        </dependency>
        <!--RabbitMQ依赖-->
        <dependency>
            <groupId>org.springframework.boot</groupId>
            <artifactId>spring-boot-starter-amqp</artifactId>
        </dependency>
        <!--web启动器-->
        <dependency>
            <groupId>org.springframework.boot</groupId>
            <artifactId>spring-boot-starter-web</artifactId>
        </dependency>
        <!--fastjson-->
        <dependency>
            <groupId>com.alibaba</groupId>
            <artifactId>fastjson</artifactId>
            <version>1.2.78</version>
        </dependency>
        <!--lombok-->
        <dependency>
            <groupId>org.projectlombok</groupId>
            <artifactId>lombok</artifactId>
        </dependency>
        <!--swagger-->
        <dependency>
            <groupId>io.springfox</groupId>
            <artifactId>springfox-swagger2</artifactId>
            <version>2.9.2</version>
        </dependency>
        <dependency>
            <groupId>io.springfox</groupId>
            <artifactId>springfox-swagger-ui</artifactId>
            <version>2.9.2</version>
        </dependency>
        <!--RabbitMQ测试依赖-->
        <dependency>
            <groupId>org.springframework.amqp</groupId>
            <artifactId>spring-rabbit-test</artifactId>
            <scope>test</scope>
        </dependency>
    </dependencies>
application.properties
spring.rabbitmq.host=ip地址
spring.rabbitmq.port=5672
spring.rabbitmq.username=admin
spring.rabbitmq.password=admin
Swagger2Config
package com.springbootrabbitmq.config;
import org.springframework.context.annotation.Bean;
import org.springframework.context.annotation.Configuration;
import springfox.documentation.builders.ApiInfoBuilder;
import springfox.documentation.service.ApiInfo;
import springfox.documentation.service.Contact;
import springfox.documentation.spi.DocumentationType;
import springfox.documentation.spring.web.plugins.Docket;
import springfox.documentation.swagger2.annotations.EnableSwagger2;

@Configuration
@EnableSwagger2
public class Swagger2Config {

    @Bean
    public Docket webApiConfig(){
      return new Docket(DocumentationType.SWAGGER_2)
              .groupName("webApi")
              .apiInfo(webApiInfo())
              .select()
              .build();
    }
  private ApiInfo webApiInfo(){
        return new ApiInfoBuilder()
                .title("rabbitmq接口文档")
                .description("本文档描述了rabbitmq微服务接口定义")
                .version("1.0")
                .contact(new Contact("yuan","http://yuan.com","2121007706@qq.com"))
                .build();
  }
}
队列TTL(配置文件)
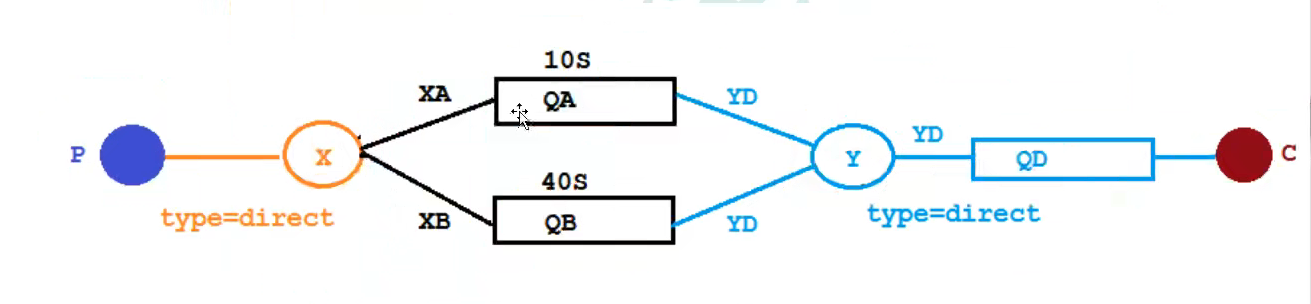
代码架构图
创建两个队列QA和QB,两者队列TTL分别设置为10S和40S,然后在创建一个交换机X和死信交换机Y,它们的类型都是direct,创建一个死信队列QD,它们的绑定关系如下:
package com.springbootrabbitmq.config;
import org.springframework.amqp.core.*;
import org.springframework.beans.factory.annotation.Qualifier;
import org.springframework.context.annotation.Bean;
import org.springframework.context.annotation.Configuration;

import java.util.HashMap;

/**
*ttl配置文件
*/
@Configuration
public class TtlQueueConfig {

    //普通交换机名称
    public static final String X_EXCHANGE="X";
    //死性交换机的名称
    public static final String Y_DEAD_LETTER_EXCHANGE="Y";
   //普通队列的名称
    public static final String QUEUE_A="QA";
    public static final String QUEUE_B="QB";
    //死性队列的名称
    public static final String DEAD_LETTER_QUEUE="QD";

    //声明xExchange 别名
    @Bean("xExchange")
    public DirectExchange xExchange(){
        return new DirectExchange(X_EXCHANGE);
    }
    //声明xExchange 别名
    @Bean("yExchange")
    public DirectExchange yExchange(){
        return new DirectExchange(Y_DEAD_LETTER_EXCHANGE);
    }
    //声明普通队列TTL位10s
    @Bean("queueA")
    public Queue queueA(){
        HashMap<String, Object> arguments = new HashMap<>(3);
        //设置死信交换机
        arguments.put("x-dead-letter-exchange",Y_DEAD_LETTER_EXCHANGE);
        //设置死性RoutingKey
        arguments.put("x-dead-letter-routing-key","YD");
        //设置TTL 单位是ms
        arguments.put("x-message-ttl",10000);
        return QueueBuilder.durable(QUEUE_A).withArguments(arguments).build();
    }
    //声明普通队列TTL位40s
    @Bean("queueB")
    public Queue queueB(){
        HashMap<String, Object> arguments = new HashMap<>(3);
        //设置死信交换机
        arguments.put("x-dead-letter-exchange",Y_DEAD_LETTER_EXCHANGE);
        //设置死性RoutingKey
        arguments.put("x-dead-letter-routing-key","YD");
        //设置TTL 单位是ms
        arguments.put("x-message-ttl",40000);
        return QueueBuilder.durable(QUEUE_B).withArguments(arguments).build();
    }
    //死性队列
    @Bean("queueD")
    public Queue queueD(){
        return QueueBuilder.durable(DEAD_LETTER_QUEUE).build();
    }
    //绑定 queueA队列和xExchange交换机
    @Bean
    public Binding queueABindingX(@Qualifier("queueA") Queue queueA,
                                  @Qualifier("xExchange") DirectExchange xExchange){
        //把queueA榜给xExchange直接它的routingKey为XA
      return BindingBuilder.bind(queueA).to(xExchange).with("XA");
    }
    //绑定 queueB队列和xExchange交换机
    @Bean
    public Binding queueBBindingX(@Qualifier("queueB") Queue queueB,
                                  @Qualifier("xExchange") DirectExchange xExchange){
        //把queueB榜给xExchange直接它的routingKey为XB
        return BindingBuilder.bind(queueB).to(xExchange).with("XB");
    }

    @Bean
    public Binding queueBBindingY(@Qualifier("queueD") Queue queueD,
                                  @Qualifier("yExchange") DirectExchange yExchange){
        //把queueB榜给xExchange直接它的routingKey为XB
        return BindingBuilder.bind(queueD).to(yExchange).with("YD");
    }
}
队列TTL(生产者)
package com.springbootrabbitmq.controller;
import lombok.extern.slf4j.Slf4j;
import org.springframework.amqp.rabbit.core.RabbitTemplate;
import org.springframework.beans.factory.annotation.Autowired;
import org.springframework.web.bind.annotation.GetMapping;
import org.springframework.web.bind.annotation.PathVariable;
import org.springframework.web.bind.annotation.RestController;
import java.util.Date;

/**
 * ttl生产者
 */
@Slf4j
@RestController
public class SendMsgController {

    @Autowired
    private RabbitTemplate rabbitTemplate;
    //开始发送消息
    @GetMapping("/ttl/sendMsg/{msg}")
    public void sendMsg(@PathVariable String msg){
       log.info("当前时间:{},发送一条消息个两个TTL队列:{}",new Date().toString(),msg);
        /**
         * 参数1:交换机
         * 参数2:routingKey:
         * 参数3:接收到的消息
         */
       rabbitTemplate.convertAndSend("X","XA","消息来自ttl为10s的队列"+msg);
       rabbitTemplate.convertAndSend("X","XB","消息来自ttl为40s的队列"+msg);
    }
}
队列TTL(消费者)
package com.springbootrabbitmq.consumer;
import com.rabbitmq.client.Channel;
import lombok.extern.slf4j.Slf4j;
import org.springframework.amqp.core.Message;
import org.springframework.amqp.rabbit.annotation.RabbitListener;
import org.springframework.stereotype.Component;
import java.util.Date;
/**
 * ttl消费者
 */
@Slf4j
@Component
public class DeadLetterQueueConsumer {
    //接收消息
    @RabbitListener(queues = "QD")
    public void receiveD(Message message, Channel channel) throws Exception{
        String msg=new String(message.getBody());
        log.info("当前时间:{},收到死信队列的消息:{}",new Date().toString(),msg);

    }
}
延迟队列优化(配置类)
第一条消息在10S后变成了死信消息,然后被消费者消费掉,第二条消息在40S之后变成了死信消息,然后被消费掉,这样一个延时队列就打造完成了。
不过,如果这样使用的话,岂不是每增加一个新的时间需求,就要新增一个队列,这里只有10S和40S两个时间选项,如果需要一个小时后处理,那么就需要增加TTL为一个小时的队列,如果是预定会议室然后提前通知这样的场景,岂不是要增加无数个队列才能满足需求?
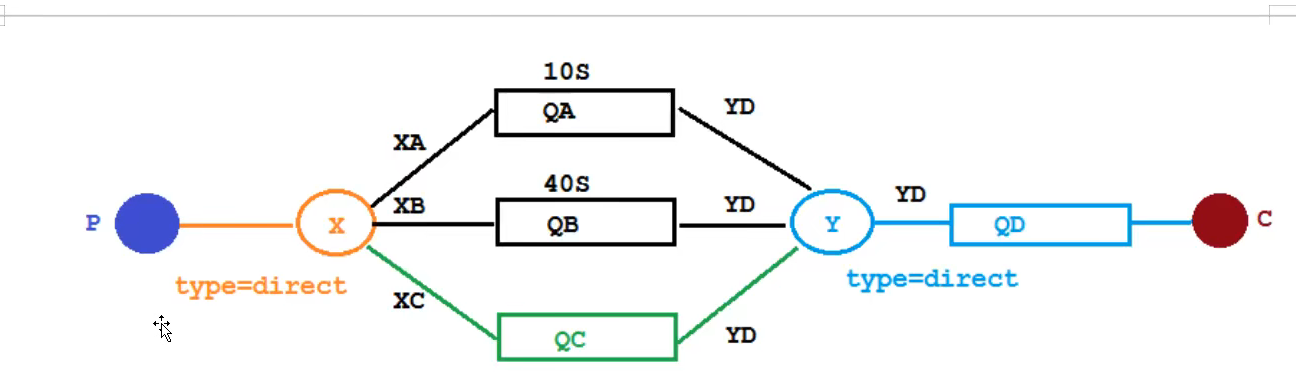
在原有的队列TTL加入一下代码新增一个QC
  //普通队列的名称
    public static final String QUEUE_C="QC";

    //声明QC
    @Bean("queueC")
    public Queue queueC(){
        HashMap<String, Object> arguments = new HashMap<>(3);
        //设置死信交换机
        arguments.put("x-dead-letter-exchange",Y_DEAD_LETTER_EXCHANGE);
        //设置死信RoutingKey
        arguments.put("x-dead-letter-routing-key","YD");
        return QueueBuilder.durable(QUEUE_C).withArguments(arguments).build();
    }

    @Bean
    public Binding queueCBinding(@Qualifier("queueC") Queue queueC,
                                 @Qualifier("xExchange") DirectExchange xExchange) {
        return BindingBuilder.bind(queueC).to(xExchange).with("XC");
    }
延迟队列优化(生产者)
在controller新加
    //开始接收消息 消息TTL
    @GetMapping("/sendMeg/{message}/{ttlTime}")
    public void sendMsg(@PathVariable String message,@PathVariable String ttlTime){
        log.info("当前时间:{},发送时长{}毫秒TTL信息给队列QC:{}",new Date().toString(),ttlTime,message);
        rabbitTemplate.convertAndSend("X","XC",message,mes->{
            //发送消息的时候 延迟时长
           mes.getMessageProperties().setExpiration(ttlTime);
            return mes;
        });
    }
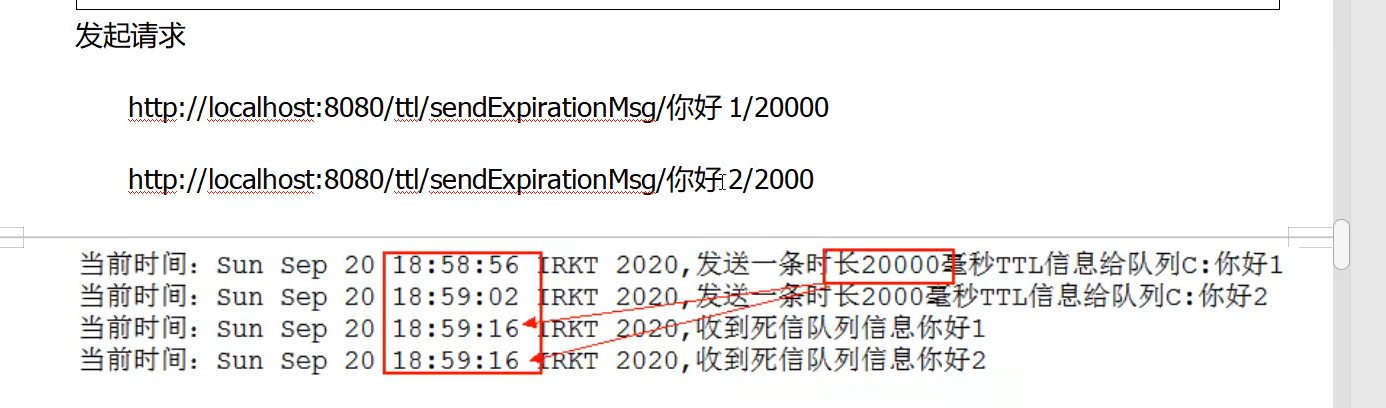
看起来似乎没什么问题,但是在最开始的时候,就介绍过如果使用在消息属性上设置TTL的方式,消息可能并不会按时“死亡“,因为RabbitMQ只会检查第一个消息是否过期,如果过期则丢到死信队列,如果第一个消息的延时时长很长,而第二个消息的延时时长很短,第二个消息并不会优先得到执行。