SpringCloud Ribbon/Feign负载均衡
Ribbon负载均衡简介
Ribbon是什么?
Spring Cloud Ribbon 是基于Netflix Ribbon 实现的一套客户端负载均衡的工具。 简单的说,Ribbon 是 Netflix 发布的开源项目,主要功能是提供客户端的软件负载均衡算法,将 Netflix 的中间层服务连接在一起。Ribbon 的客户端组件提供一系列完整的配置项,如:连接超时、重试等。简单的说,就是在配置文件中列出 LoadBalancer (简称LB:负载均衡) 后面所有的及其,Ribbon 会自动的帮助你基于某种规则 (如简单轮询,随机连接等等) 去连接这些机器。我们也容易使用 Ribbon 实现自定义的负载均衡算法!
Ribbon能干嘛?
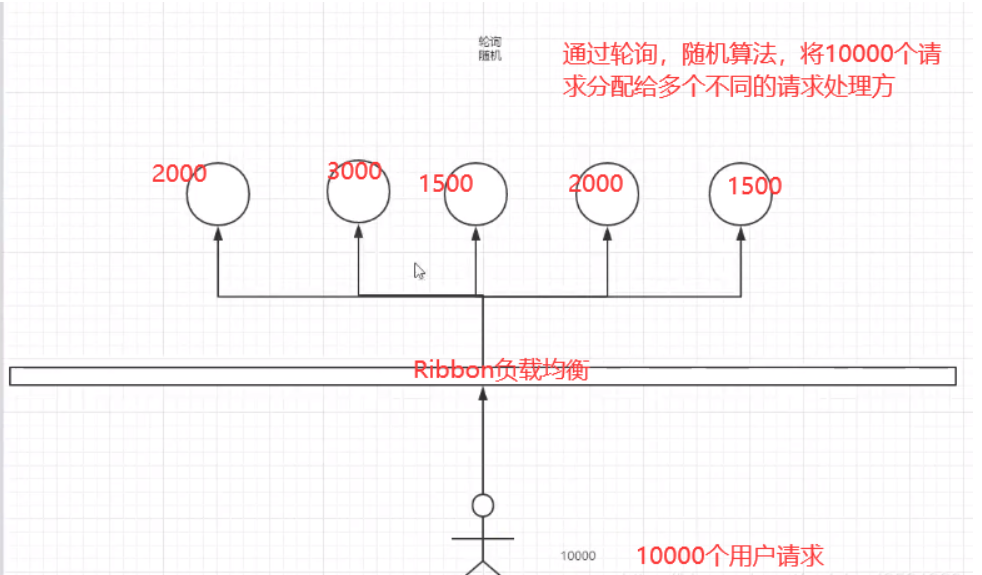
LB,即负载均衡 (LoadBalancer) ,在微服务或分布式集群中经常用的一种应用。 负载均衡简单的说就是将用户的请求平摊的分配到多个服务上,从而达到系统的HA (高用)。 常见的负载均衡软件有 Nginx、Lvs 等等。 Dubbo、SpringCloud 中均给我们提供了负载均衡,SpringCloud 的负载均衡算法可以自定义。 负载均衡简单分类: 集中式LB 即在服务的提供方和消费方之间使用独立的LB设施,如Nginx(反向代理服务器),由该设施负责把访问请求通过某种策略转发至服务的提供方! 进程式 LB 将LB逻辑集成到消费方,消费方从服务注册中心获知有哪些地址可用,然后自己再从这些地址中选出一个合适的服务器。 Ribbon 就属于进程内LB,它只是一个类库,集成于消费方进程,消费方通过它来获取到服务提供方的地址!
Ribbon集群负载均衡
集成Ribbon
springcloud-consumer-dept-80向pom.xml中添加Eureka依赖
 <!--eureka-->
        <dependency>
            <groupId>org.springframework.cloud</groupId>
            <artifactId>spring-cloud-starter-netflix-eureka-client</artifactId>
            <version>2.2.9.RELEASE</version>
        </dependency>
在application.yml文件中配置Eureka
#Eureka配置
eureka:
  client:
    register-with-eureka: false #不向Eureka注册自己
    service-url:
      defaultZone: http://eureka7001.com:7001/eureka/,http://eureka7002.com:7002/eureka/,http://eureka7003.com:7003/eureka/
主启动类加上@EnableEurekaClient注解,开启Eureka
//Ribbon 和Eureka整合以后,客户端可以直接调用,不用关心IP地址和端口引
@SpringBootApplication
@EnableEurekaClient
public class DeptConsumer_80 {
    public static void main(String[] args) {
        SpringApplication.run(DeptConsumer_80.class,args);
    }
}
自定义Spring配置类:ConfigBean.java 配置负载均衡实现RestTemplate
@Configuration
public class ConfigBean { //@Configuration -- spring applicationContext.xmL
    //配置负载均衡实现RestTempLate
     @Bean
     @LoadBalanced //配置负载均衡实现RestTemplate
    public RestTemplate getTemplate() {
        return new RestTemplate();
    }
}
修改conroller:DeptController.java
   // private static String REST_URL_PREFIX = "http://localhost:8081";
   //Ribbon。我们这里的地址,应该是一个变量,通过服务名来访问
   private static String REST_URL_PREFIX = "http://SPRINGCLOUD-PROVIDER-DEPT";
使用Ribbon实现负载均衡
流程图
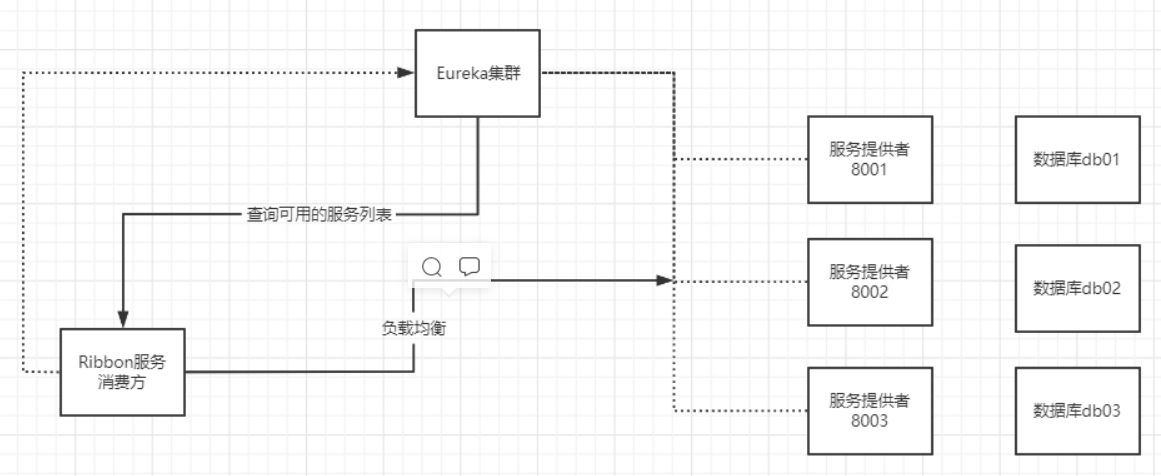
新建两个服务提供者Moudle:springcloud-provider-dept-8002 ,springcloud-provider-dept-8003
参照springcloud-provider-dept-8001 依次为另外两个Moudle添加pom.xml依赖 、resourece下的mybatis和application.yml配置,Java代码
8002模块修改
启动类
@SpringBootApplication
@EnableEurekaClient //在服务启动后自动注册到Eureka中!
@EnableDiscoveryClient//开启服务发现客户端的注解,可以用来获取一些配置的信息,得到具体的微服务
public class DeptProvider_8002 {
    public static void main(String[] args) {
        SpringApplication.run(DeptProvider_8002.class,args);
    }
}
application.yml
server:
  port: 8082
#mybatis配置
mybatis:
  type-aliases-package: com.springcloud.pojo
  config-location: classpath:mybatis/mybatis-config.xml
  mapper-locations: classpath:mybatis/mapper/*.xml

#spring 配置
spring:
  application:
    name: springcloud-provider-dept #项目的模块起名字
  datasource:
    url: jdbc:mysql://localhost:3306/db02?characterEncoding=utf8&useSSL=false&serverTimezone=UTC&allowPublicKeyRetrieval=true
    type: com.alibaba.druid.pool.DruidDataSource
    driver-class-name: com.mysql.cj.jdbc.Driver
    username: root
    password: root

# Eureka配置:配置服务注册中心地址
eureka:
  client:
    service-url:
      defaultZone: http://eureka7001.com:7001/eureka/,http://eureka7002.com:7002/eureka/,http://eureka7003.com:7003/eureka/
  instance:
    instance-id: springcloud-provider-depet8002  #修改Eureka得默认描述信息

#info配置
info:
  app.name: yuan-springcloud
  company.name: yuan.com
8003模块修改
@SpringBootApplication
@EnableEurekaClient //在服务启动后自动注册到Eureka中!
@EnableDiscoveryClient//开启服务发现客户端的注解,可以用来获取一些配置的信息,得到具体的微服务
public class DeptProvider_8003 {
    public static void main(String[] args) {
        SpringApplication.run(DeptProvider_8003.class,args);
    }
}
application.yml
server:
  port: 8083
#mybatis配置
mybatis:
  type-aliases-package: com.springcloud.pojo
  config-location: classpath:mybatis/mybatis-config.xml
  mapper-locations: classpath:mybatis/mapper/*.xml

#spring 配置
spring:
  application:
    name: springcloud-provider-dept #项目的模块起名字
  datasource:
    url: jdbc:mysql://localhost:3306/db03?characterEncoding=utf8&useSSL=false&serverTimezone=UTC&allowPublicKeyRetrieval=true
    type: com.alibaba.druid.pool.DruidDataSource
    driver-class-name: com.mysql.cj.jdbc.Driver
    username: root
    password: root

# Eureka配置:配置服务注册中心地址
eureka:
  client:
    service-url:
      defaultZone: http://eureka7001.com:7001/eureka/,http://eureka7002.com:7002/eureka/,http://eureka7003.com:7003/eureka/
  instance:
    instance-id: springcloud-provider-depet8003  #修改Eureka得默认描述信息

#info配置
info:
  app.name: yuan-springcloud
  company.name: yuan.com
其余得cv8001的即可
启动所有服务测试(根据自身电脑配置决定启动服务的个数),访问http://eureka7001查看结果
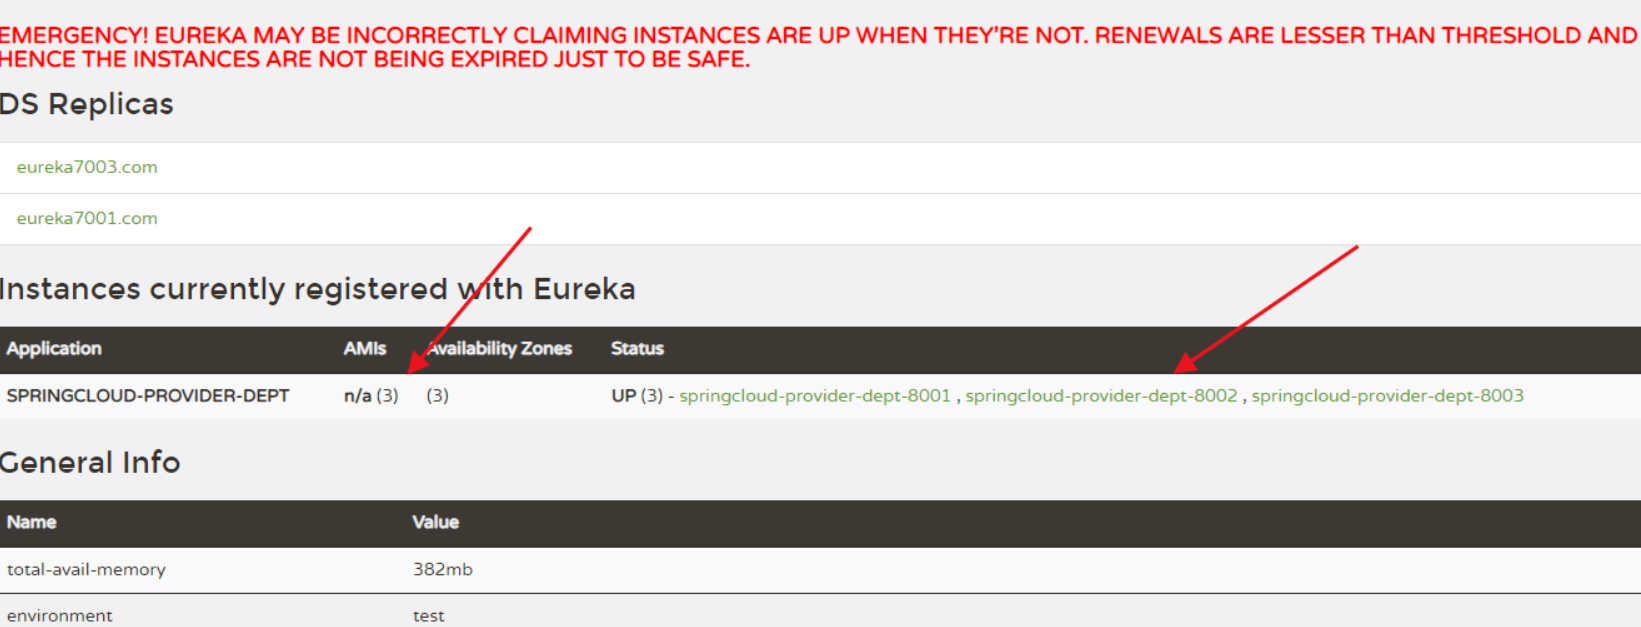
每次访问http://localhost/consumer/dept/li访问集群中某个服务提供者,这种情况叫做轮询
切换或者自定义规则
在springcloud-provider-dept-80模块下的ConfigBean中进行配置,切换使用不同的规则
@Configuration
public class ConfigBean {//@Configuration -- spring  applicationContext.xml

    /**
     * IRule:
     * RoundRobinRule 轮询策略
     * RandomRule 随机策略
     * AvailabilityFilteringRule : 会先过滤掉,跳闸,访问故障的服务~,对剩下的进行轮询~
     * RetryRule : 会先按照轮询获取服务~,如果服务获取失败,则会在指定的时间内进行,重试
     */
    @Bean
    public IRule myRule() {
        return new RandomRule();//使用随机策略
        //return new RoundRobinRule();//使用轮询策略
        //return new AvailabilityFilteringRule();//使用轮询策略
        //return new RetryRule();//使用轮询策略
    }
}
也可以自定义规则,在myRule包下自定义一个配置类MyRule.java,注意:该包不要和主启动类所在的包同级,要跟启动类所在包同级:
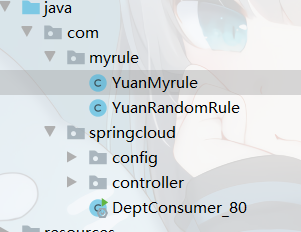
YuanMyrule.java
package com.myrule;
import com.netflix.loadbalancer.IRule;
import org.springframework.context.annotation.Bean;
import org.springframework.context.annotation.Configuration;

@Configuration
public class YuanMyrule {
    /**
     * 会先按照轮询获取服务~,如果服务获取失败,则会在指定的时间内进行,重试
     * @return
     */
    @Bean
    public IRule myRule() {
        return new YuanRandomRule();//默认是轮询,现在我们定义为YuanRandomRuLe
    }
}
主启动类开启负载均衡并指定自定义的MyRule配置类
//Ribbon 和 Eureka 整合以后,客户端可以直接调用,不用关心IP地址和端口号
@SpringBootApplication
@EnableEurekaClient
//在微服务启动的时候就能加载自定义的Ribbon类(自定义的规则会覆盖原有默认的规则)
@RibbonClient(name = "SPRINGCLOUD-PROVIDER-DEPT",configuration = YuanMyrule.class)//开启负载均衡,并指定自定义的规则
public class DeptConsumer_80 {
    public static void main(String[] args) {
        SpringApplication.run(DeptConsumer_80.class,args);
    }
}
自定义的规则(这里我们参考Ribbon中默认的规则代码自己稍微改动):
YuanRandomRule.java
package com.myrule;
import com.netflix.client.config.IClientConfig;
import com.netflix.loadbalancer.AbstractLoadBalancerRule;
import com.netflix.loadbalancer.ILoadBalancer;
import com.netflix.loadbalancer.Server;
import java.util.List;
import java.util.concurrent.ThreadLocalRandom;

public class YuanRandomRule extends AbstractLoadBalancerRule {
    /**
     * 每个服务访问5次则换下一个服务(总共3个服务)
     * total=0,默认=0,如果=5,指向下一个服务节点
     * index=0,默认=0,如果total=5,index+1
     */
    private int total = 0;//被调用的次数
    private int currentIndex = 0;//当前是谁在提供服务
    public Server choose(ILoadBalancer lb, Object key) {
        if (lb == null) {
            return null;
        }
        Server server = null;

        while (server == null) {
            if (Thread.interrupted()) {
                return null;
            }
            List<Server> upList = lb.getReachableServers();//获得活着的服务
            List<Server> allList = lb.getAllServers();//获得全部的服务

            int serverCount = allList.size();
            if (serverCount == 0) {
                return null;
            }

           // int index = chooseRandomInt(serverCount);//生成区间随机数
          //  server = upList.get(index);//从活着的服务中,随机获取一个~

            //自定义算法==================================================
            if (total < 5) {
                server = upList.get(currentIndex);
                total++;
            } else {
                total = 0;
                currentIndex++;
                if (currentIndex > upList.size()) {
                    currentIndex = 0;
                }
                server = upList.get(currentIndex);//从活着的服务中,获取指定的服务来进行操作
            }
            //==========================================================
            if (server == null) {
                Thread.yield();
                continue;
            }

            if (server.isAlive()) {
                return (server);
            }

            server = null;
            Thread.yield();
        }

        return server;

    }

    protected int chooseRandomInt(int serverCount) {
        return ThreadLocalRandom.current().nextInt(serverCount);
    }

	@Override
	public Server choose(Object key) {
		return choose(getLoadBalancer(), key);
	}

	@Override
	public void initWithNiwsConfig(IClientConfig clientConfig) {

	}
}
Feign:负载均衡(基于服务端)
Feign简介
Feign是声明式Web Service客户端,它让微服务之间的调用变得更简单,类似controller调用service。SpringCloud集成了Ribbon和Eureka,可以使用Feigin提供负载均衡的http客户端
只需要创建一个接口,然后添加注解即可~
Feign,主要是社区版,大家都习惯面向接口编程。这个是很多开发人员的规范。调用微服务访问两种方法
- 微服务名字 【ribbon】
- 接口和注解 【feign】
Feign能干什么?
Feign旨在使编写Java Http客户端变得更容易 前面在使用Ribbon + RestTemplate时,利用RestTemplate对Http请求的封装处理,形成了一套模板化的调用方法。但是在实际开发中,由于对服务依赖的调用可能不止一处,往往一个接口会被多处调用,所以通常都会针对每个微服务自行封装一个客户端类来包装这些依赖服务的调用。所以,Feign在此基础上做了进一步的封装,由他来帮助我们定义和实现依赖服务接口的定义*,在Feign的实现下,我们只需要创建一个接口并使用注解的方式来配置它 (类似以前Dao接口上标注Mapper注解,现在是一个微服务接口上面标注一个Feign注解),即可完成对服务提供方的接口绑定,简化了使用Spring Cloud Ribbon 时,自动封装服务调用客户端的开发量。*
Feign默认集成了Ribbon
- 利用Ribbon维护了MicroServiceCloud-Dept的服务列表信息,并且通过轮询实现了客户端的负载均衡,而与Ribbon不同的是,通过Feign只需要定义服务绑定接口且以声明式的方法,优雅而简单的实现了服务调用。
Feign实现
拷贝springcloud-consumer-dept-80模块下的pom.xml,resource,以及java代码到springcloud-consumer-feign模块
给springcloud-api和springcloud-consumer-dept-feign添加依赖
<!--feign-->
<dependency>
    <groupId>org.springframework.cloud</groupId>
    <artifactId>spring-cloud-starter-openfeign</artifactId>
    <version>2.2.9.RELEASE</version>
</dependency>
 <!--eureka-->
<dependency>
    <groupId>org.springframework.cloud</groupId>
    <artifactId>spring-cloud-starter-netflix-eureka-client</artifactId>
    <version>2.2.9.RELEASE</version>
</dependency>
修改springcloud-consumer-dept-feign模块下的:DeptConsumerController
package com.springcloud.controller;
import com.springcloud.pojo.Dpet;
import com.springcloud.service.DeptClientService;
import org.springframework.beans.factory.annotation.Autowired;
import org.springframework.web.bind.annotation.*;
import java.util.List;
/**
*服务消费者
*/
@RestController
public class DeptConsumerController {

   @Autowired
    private DeptClientService deptClientService=null;
    /**
     * 消费方添加部门信息
     * @param dept
     * @return
     */
    @RequestMapping("/consumer/dept/add")
    public boolean add(Dpet dept) {
        return deptClientService.addDept(dept);
    }
    /**
     * 消费方根据id查询部门信息
     * @param id
     * @return
     */
    @RequestMapping("/consumer/dept/dpetById/{id}")
    public Dpet get(@PathVariable("id") Long id) {
        return this.deptClientService.queryById(id);
    }

    /**
     * 消费方查询部门信息列表
     * @return
     */
    @RequestMapping("/consumer/dept/list")
    public List<Dpet> list() {
        return deptClientService.queryAll();
    }
}
FeginDeptConsumer_80启动类
package com.springcloud;;
import org.springframework.boot.SpringApplication;
import org.springframework.boot.autoconfigure.SpringBootApplication;
import org.springframework.cloud.netflix.eureka.EnableEurekaClient;
import org.springframework.cloud.openfeign.EnableFeignClients;

//Ribbon 和Eureka整合以后,客户端可以直接调用,不用关心IP地址和端口引
@SpringBootApplication
@EnableEurekaClient
// feign客户端注解,并指定要扫描的包以及配置接口DeptClientService
@EnableFeignClients(basePackages = {"com.springcloud.service"})
public class FeginDeptConsumer_80 {
    public static void main(String[] args) {
        SpringApplication.run(FeginDeptConsumer_80.class,args);
    }
}
application.yml新增
#可以不写
feign:
  client:
    config:
      default:
        connectTimeout: 60000
        readTimeout: 60000
ribbon:
  eureka:
    enabled: true
改造springcloud-api代码,添加service包:新建DeptClientService Java类
package com.springcloud.service;
import com.springcloud.pojo.Dpet;
import org.springframework.cloud.openfeign.FeignClient;
import org.springframework.web.bind.annotation.*;
import java.util.List;

// @FeignClient:微服务客户端注解,value:指定微服务的名字,这样就可以使Feign客户端直接找到对应的微服务
@FeignClient(value = "SPRINGCLOUD-PROVIDER-DEPT")
public interface DeptClientService {

    //dept/allDepet对应的是服务提供者的/dept/allDepet
    @GetMapping("/dept/allDepet")
    public List<Dpet> queryAll();

    @GetMapping("/dept/dpetById/{id}")
    public Dpet queryById(@PathVariable("id") Long id);

    @GetMapping("/dept/add")
    public boolean addDept(Dpet dept);
}