Sentinel的使用
Sentinel的基本介绍
随着微服务的流行,服务和服务之间的稳定性变得越来越重要。Sentinel 以流量为切入点,从流量控制、熔断降级、系统负载保护等多个维度保护服务的稳定性。
Sentinel 具有以下特征:
- 丰富的应用场景:Sentinel 承接了阿里巴巴近 10 年的双十一大促流量的核心场景,例如秒杀(即突发流量控制在系统容量可以承受的范围)、消息削峰填谷、集群流量控制、实时熔断下游不可用应用等。
- 完备的实时监控:Sentinel 同时提供实时的监控功能。您可以在控制台中看到接入应用的单台机器秒级数据,甚至 500 台以下规模的集群的汇总运行情况。
- 广泛的开源生态:Sentinel 提供开箱即用的与其它开源框架/库的整合模块,例如与 Spring Cloud、Apache Dubbo、gRPC、Quarkus 的整合。您只需要引入相应的依赖并进行简单的配置即可快速地接入 Sentinel。同时 Sentinel 提供 Java/Go/C++ 等多语言的原生实现。
- 完善的 SPI 扩展机制:Sentinel 提供简单易用、完善的 SPI 扩展接口。您可以通过实现扩展接口来快速地定制逻辑。例如定制规则管理、适配动态数据源等。
Sentinel 的主要特性:

<!--SpringCloud ailibaba sentinel -->
<dependency>
    <groupId>com.alibaba.cloud</groupId>
    <artifactId>spring-cloud-starter-alibaba-sentinel</artifactId>
</dependency>
Sentinel初始化监控
下载地址:https://github.com/alibaba/Sentinel/releases
打开cmd ,找到下载的Sentienl,启动sentinel
java -jar sentinel-dashboard-1.7.2.jar
浏览器访问:http://localhost:8080/#/login
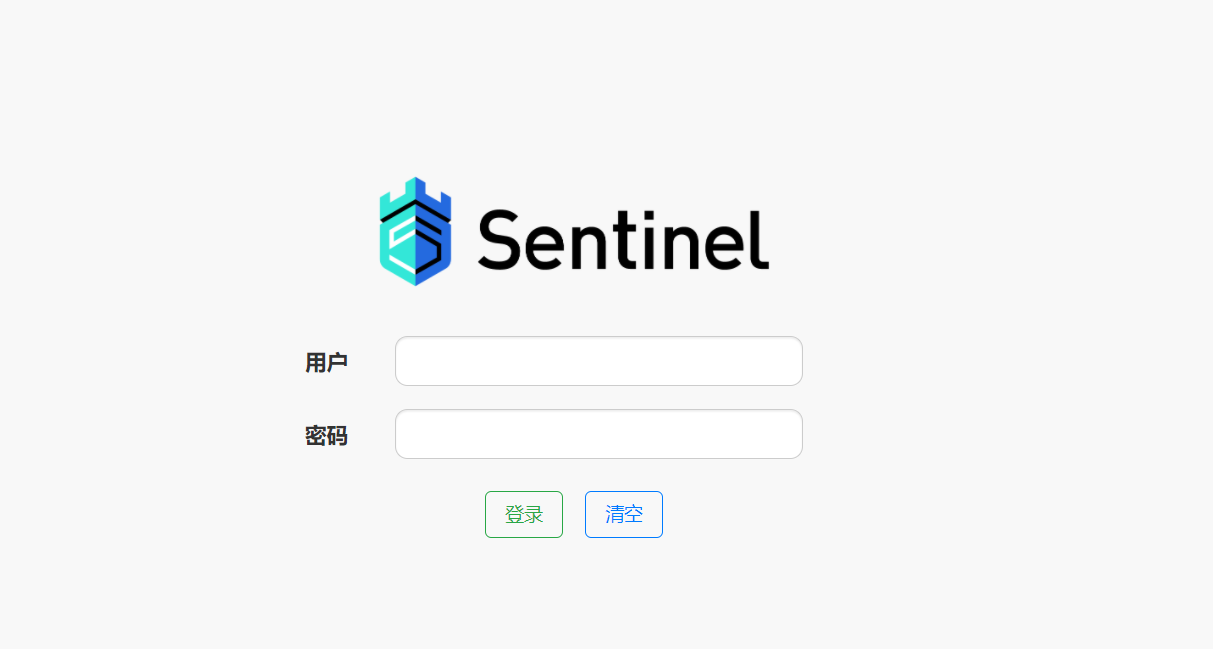
默认账号密码都是sentinel,
- Linux命令下载
wget https://github.com/alibaba/Sentinel/releases/download/1.7.2/sentinel-dashboard-1.7.2.jar
通过java -jar 命令启动sentinel服务
java -jar sentinel-dashboard-1.7.2.jar

//后台启动
nohup java -jar sentinel-dashboard-1.7.2.jar > /home/log/sentinel.log 2>&1 &
Sentinel流控8401
新建一个8401模块
    <!--SpringCloud ailibaba sentinel -->
    <dependency>
        <groupId>com.alibaba.cloud</groupId>
        <artifactId>spring-cloud-starter-alibaba-sentinel</artifactId>
    </dependency>
导入依赖
    <dependencies>
        <!--SpringCloud ailibaba nacos -->
        <dependency>
            <groupId>com.alibaba.cloud</groupId>
            <artifactId>spring-cloud-starter-alibaba-nacos-discovery</artifactId>
        </dependency>
        <!--SpringCloud ailibaba sentinel-datasource-nacos 后续做持久化用到-->
        <dependency>
            <groupId>com.alibaba.csp</groupId>
            <artifactId>sentinel-datasource-nacos</artifactId>
        </dependency>
        <!--SpringCloud ailibaba sentinel -->
        <dependency>
            <groupId>com.alibaba.cloud</groupId>
            <artifactId>spring-cloud-starter-alibaba-sentinel</artifactId>
        </dependency>
        <!--openfeign-->
        <dependency>
            <groupId>org.springframework.cloud</groupId>
            <artifactId>spring-cloud-starter-openfeign</artifactId>
        </dependency>
        <!-- SpringBoot整合Web组件+actuator -->
        <dependency>
            <groupId>org.springframework.boot</groupId>
            <artifactId>spring-boot-starter-web</artifactId>
        </dependency>
        <dependency>
            <groupId>org.springframework.boot</groupId>
            <artifactId>spring-boot-starter-actuator</artifactId>
        </dependency>
        <!--日常通用jar包配置-->
        <dependency>
            <groupId>org.springframework.boot</groupId>
            <artifactId>spring-boot-devtools</artifactId>
            <scope>runtime</scope>
            <optional>true</optional>
        </dependency>
        <dependency>
            <groupId>cn.hutool</groupId>
            <artifactId>hutool-all</artifactId>
            <version>4.6.3</version>
        </dependency>
        <dependency>
            <groupId>org.projectlombok</groupId>
            <artifactId>lombok</artifactId>
            <optional>true</optional>
        </dependency>
        <dependency>
            <groupId>org.springframework.boot</groupId>
            <artifactId>spring-boot-starter-test</artifactId>
            <scope>test</scope>
        </dependency>
    </dependencies>
application.yml
server:
  port: 8401

spring:
  application:
    name: cloudalibaba-sentinel-service
  cloud:
    nacos:
      discovery:
        server-addr: localhost:8848 #Nacos服务注册中心地址
    sentinel:
      transport:
        dashboard: localhost:8080 #配置Sentinel dashboard地址
        port: 8719
      datasource: #将sentinel配置到nacos中
        ds1:
          nacos:
            server-addr: localhost:8848
            dataId: cloudalibaba-sentinel-service
            groupId: DEFAULT_GROUP
            data-type: json
            rule-type: flow

management:
  endpoints:
    web:
      exposure:
        include: '*'

feign:
  sentinel:
    enabled: true # 激活Sentinel对Feign的支持
controller
@RestController
@Slf4j
public class FlowLimitController
{
    @GetMapping("/testA")
    public String testA()
    {
        return "------testA";
    }

    @GetMapping("/testB")
    public String testB()
    {
        log.info(Thread.currentThread().getName()+"\t"+"...testB");
        return "------testB";
    }
}
启动类
@SpringBootApplication
@EnableDiscoveryClient
public class CloudalibabaSentinelService8401Application {

    public static void main(String[] args) {
        SpringApplication.run(CloudalibabaSentinelService8401Application.class, args);
    }

}
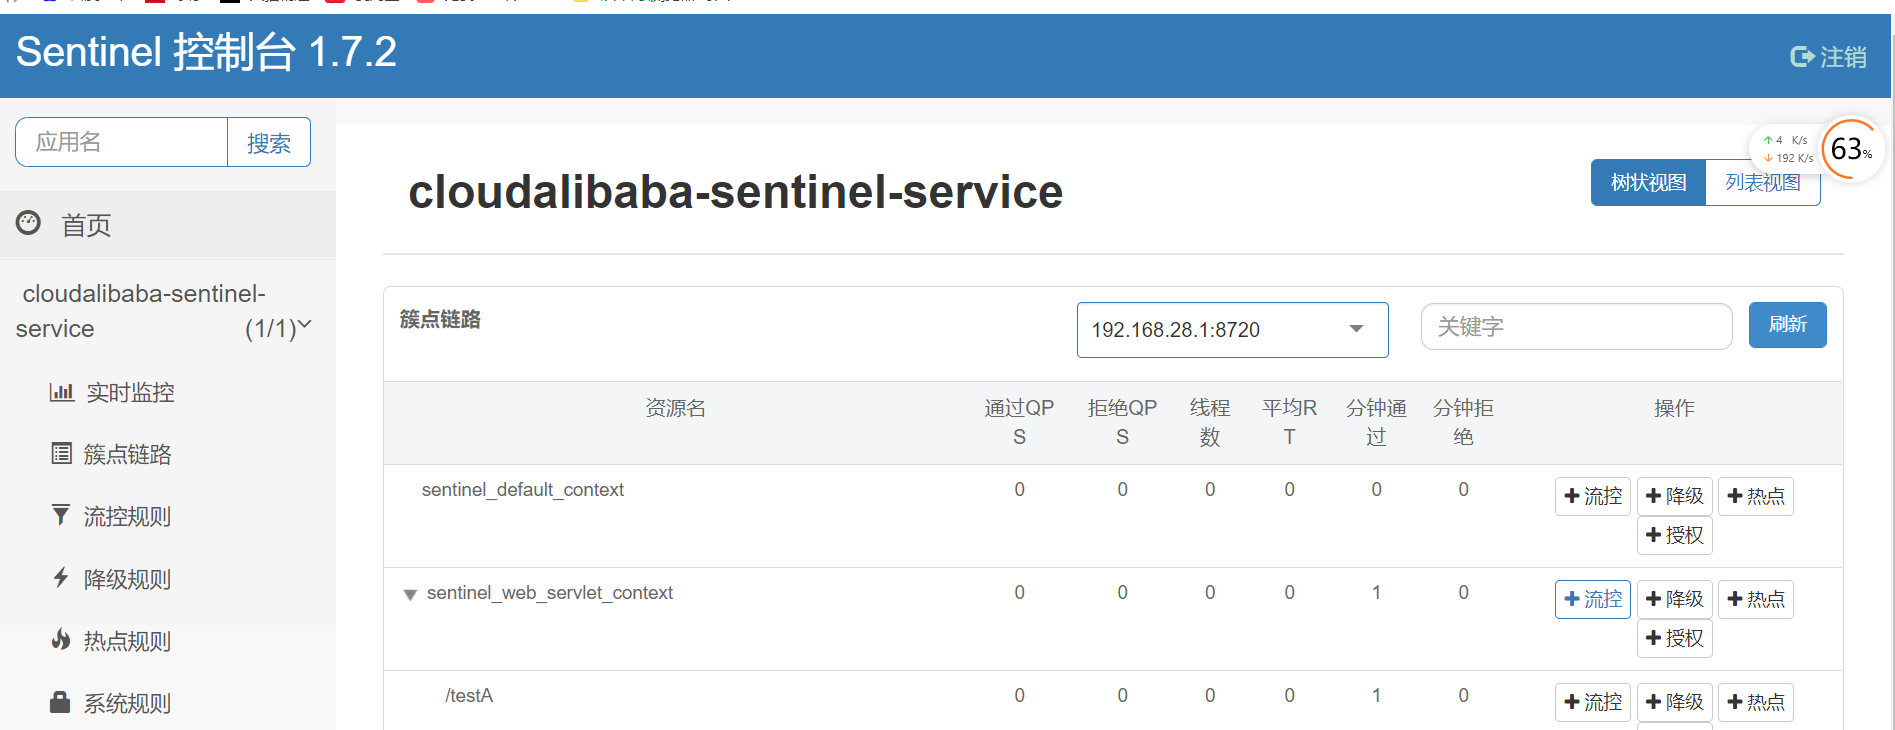
先访问cotrlloer页面在访问Sentinel可以发现成功监控
流控规则
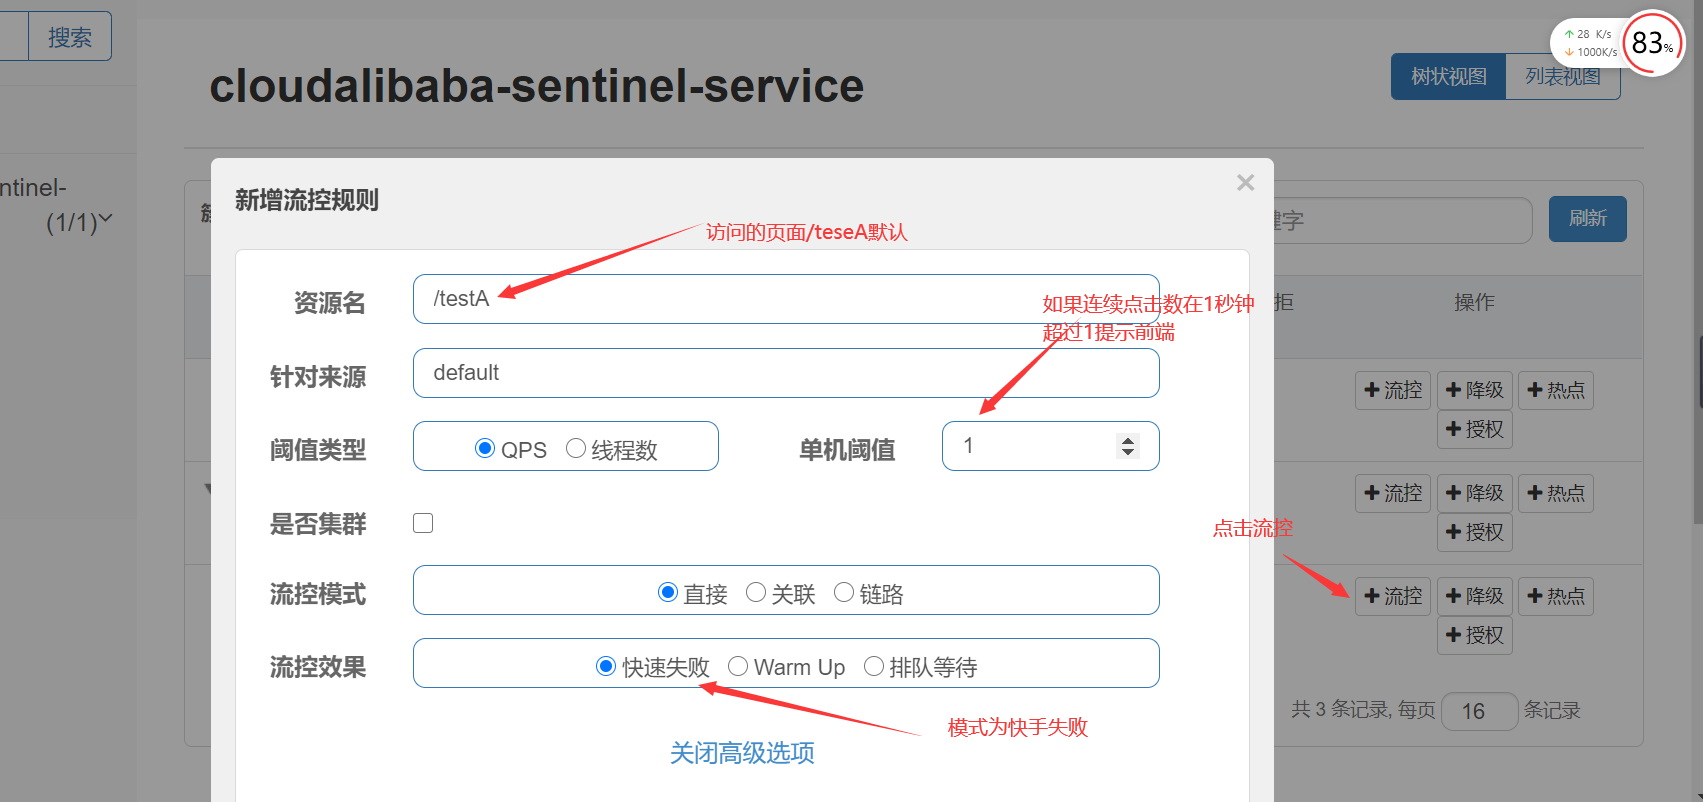
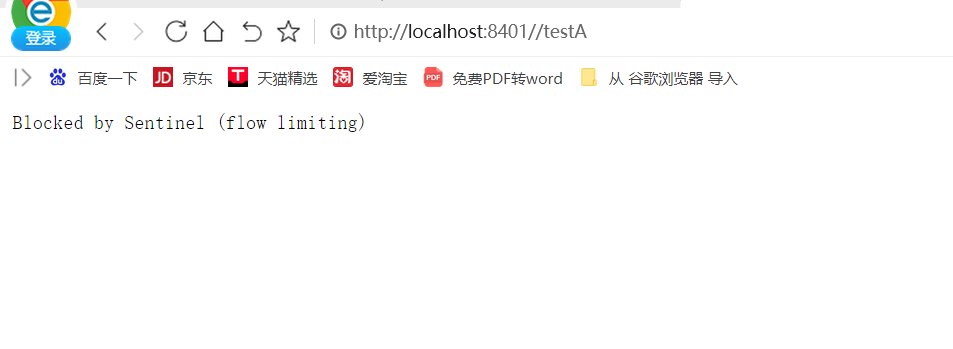
在浏览器连续刷新,默认提示
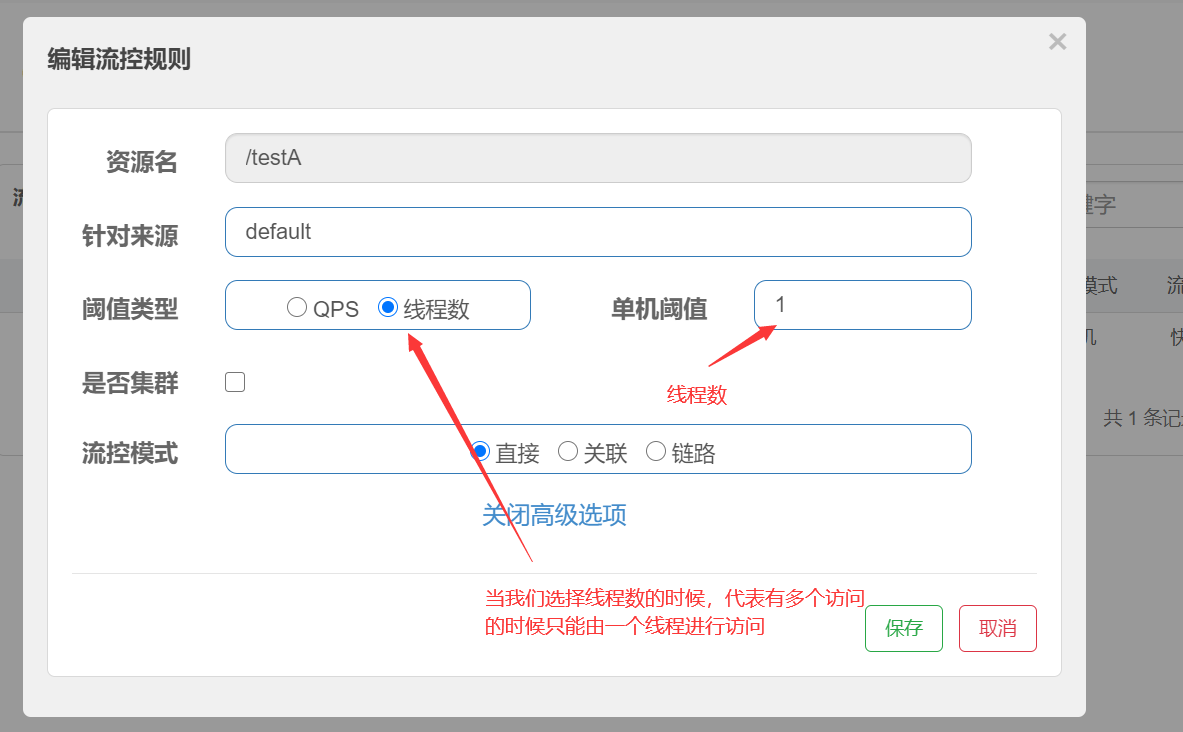
流控规则线程数
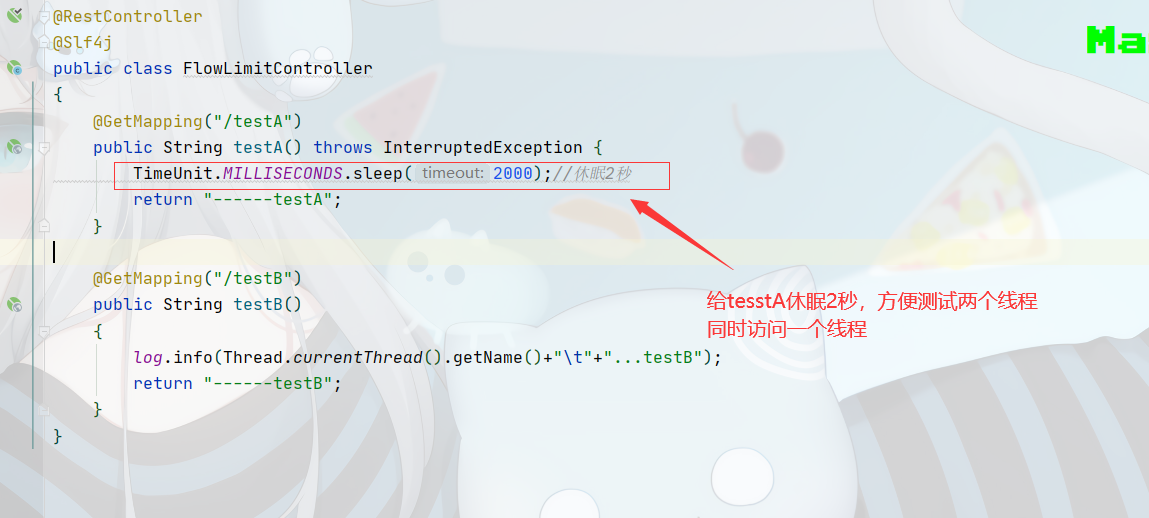
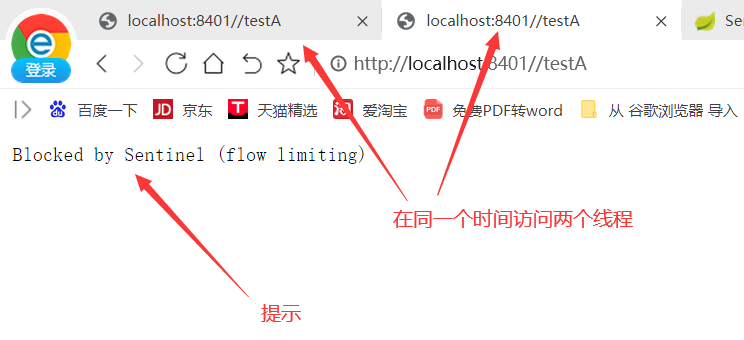
浏览器测试
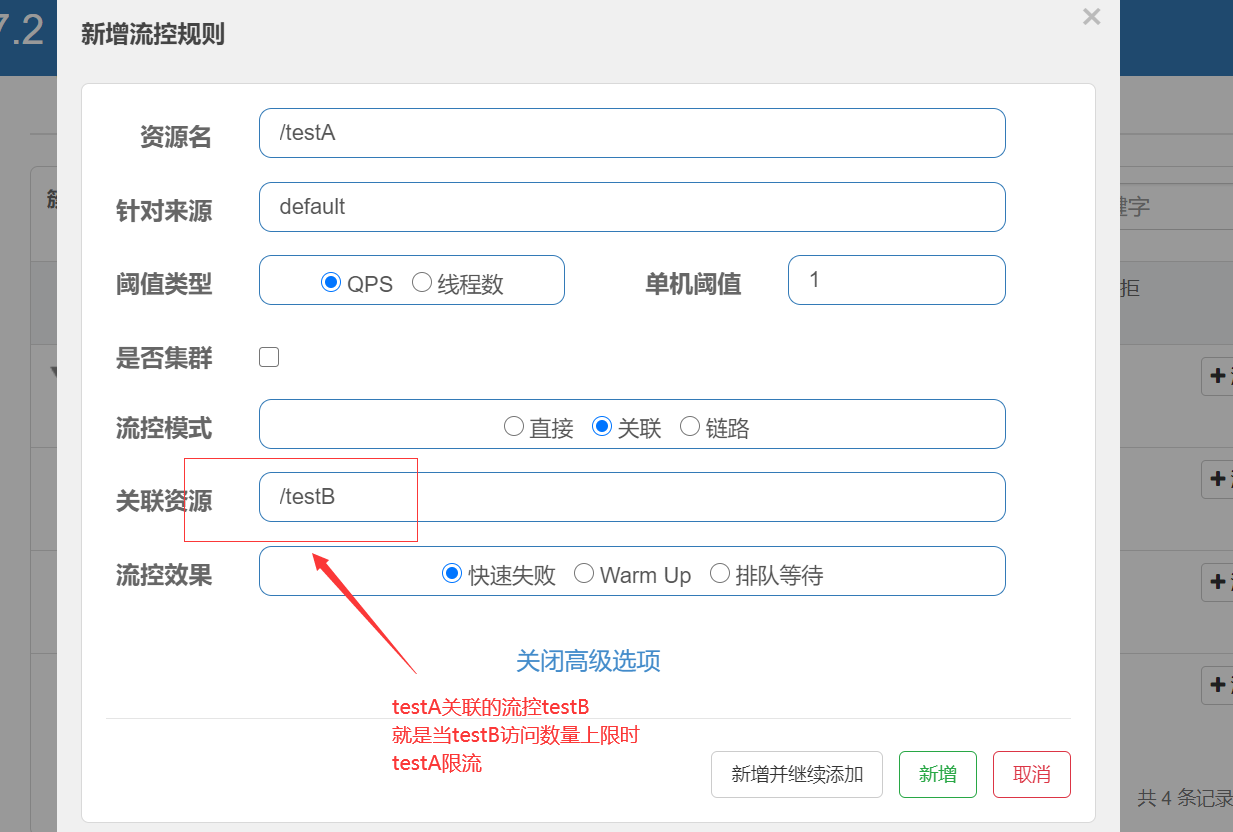
流控规则关联
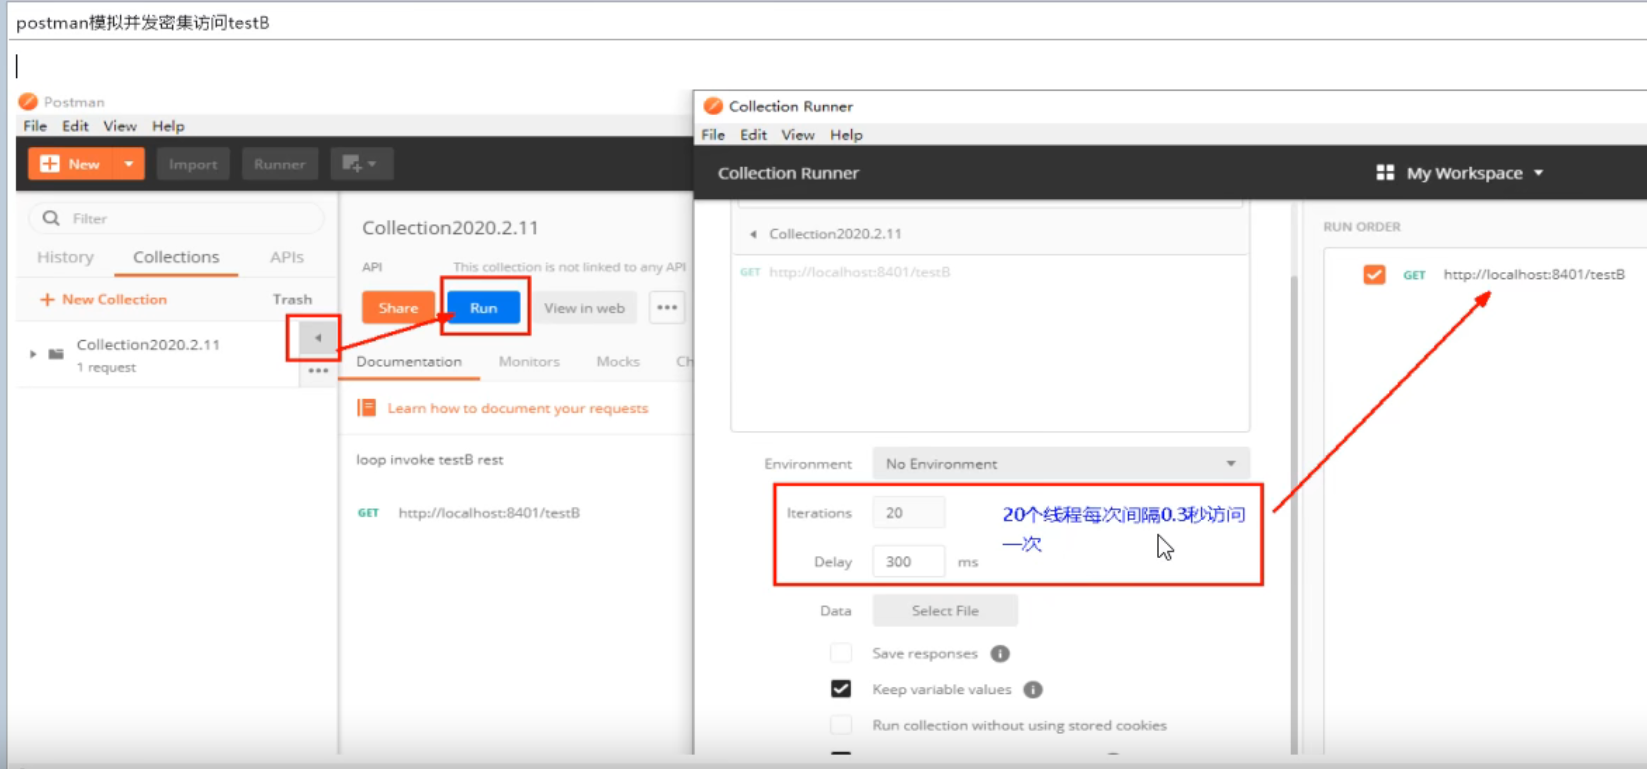
使用postman模拟并发
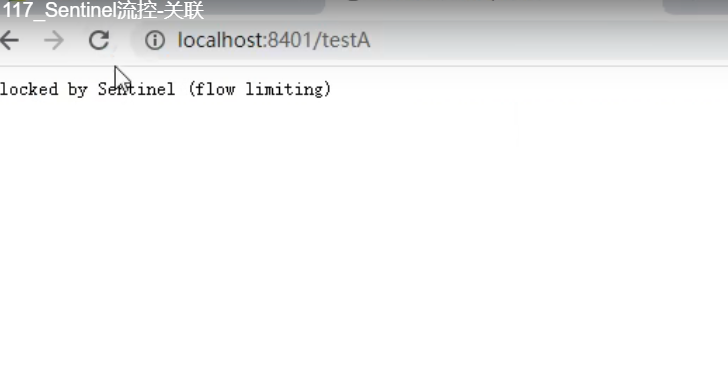
流控关联访问
Sentinel流控—预热
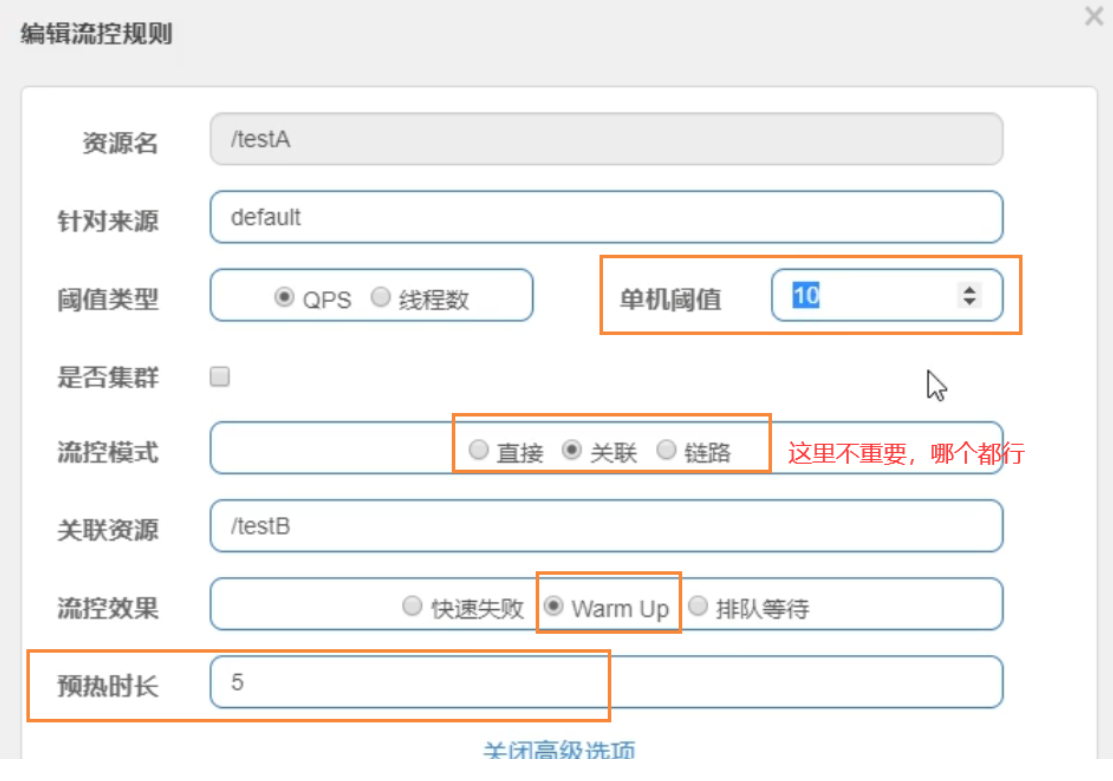
假设流控模式是直接,流控效果是warm up(上图的流控模式不太对),刚开始的 阈值 是 threshold / coldFactory(threshold 是实际阈值(单机阈值),coldFactory是冷加载因子),按上面的图来说,刚开始的阈值QPS是 3.3,当请求QPS超过 3.3,这时候就会启动预热,在预热时长5秒内,慢慢地把阈值提高,直到10
总结就是,刚开始把 阈值调低,不要让过多的请求访问服务器,导致冲垮服务器,先让服务器一点一点处理,再慢慢加量。经典的例子:一个好久没运动的人,你刚开始让他跑10圈,他可能会累死,但是你给他一个预热时间,比如 第一天跑 2圈,第三天跑 3 圈,第四天跑4圈,以此类推...
Sentinel流控—排队等待
匀速排队( RuleConstant.CONTROL_BEHAVIOR_RATE_LINITER )方式会严格控制请求通过的间隔时间,也即是让请求以均匀的速度通过,对应的是漏桶算法。
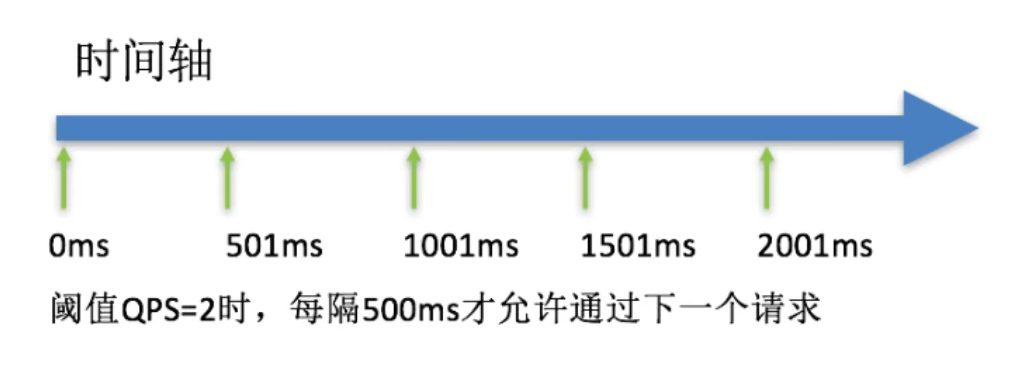
这种方式主要用于处理间隔性突发的流量,例如消息队列。想象一下这样的场景,在某一秒有大量的请求到来,而接下来的几秒则处于空闲状态,我们希望系统能够在接下来的空闲期间逐渐必理这些请求,而不是在第一秒直接拒绝多余的请求
排队等待: 让请求以匀速通过,阈值类型必须设置为QPS
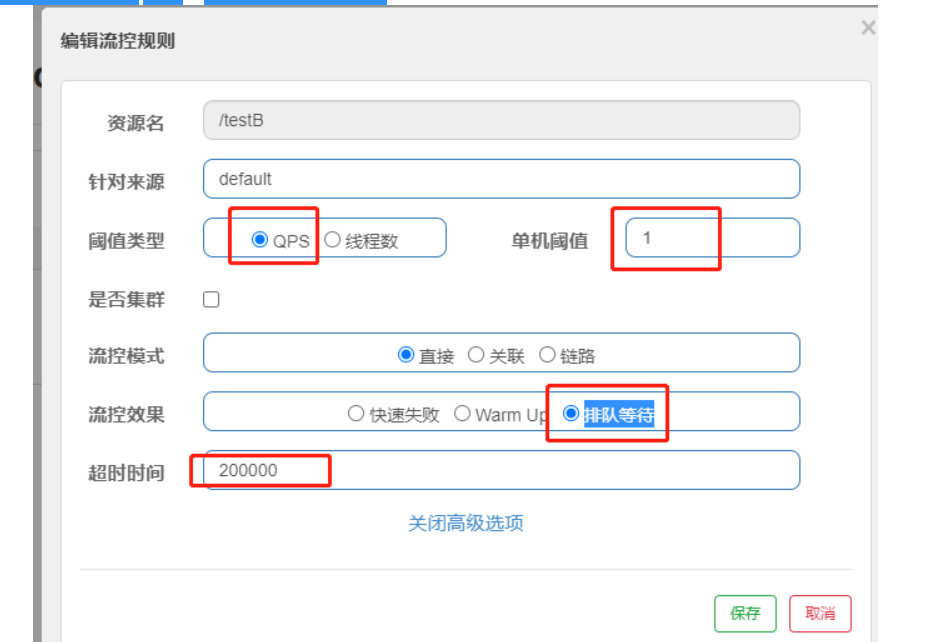
排队等待,我说的比较通俗点,就是 服务器匀速处理请求,当超过阈值的后的其他请求就排队,当排队时间过了超时时间,就返回提示信息。
比如:现在QPS阈值为5,直接且排队等待,超时时间2s,现在有100个请求过来,服务器最多处理 5 个,其他慢慢排队,在处理所有的请求的时候,都是均匀的处理,0.01S处理第一个请求,0.21S处理第二个请求,0.41S请求处理第三个请求...0.81S处理第5个请求,然后依次类推,间隔时间为 1秒/QPS,比如1/5,0.2S处理一个请求;在排队的请求,如果排队的时间超过了超时时间,就不再等待,返回给客户端一个提示信息。
注意:排队等待只能是 QPS
该流控模式和效果适用的场景:
Sentinel降级
除了流量控制以外,对调用链路中不稳定的资源进行熔断降级也是保障高可用的重要措施之一。一个服务常常会调用别的模块,可能是另外的一个远程服务、数据库,或者第三方 API 等。例如,支付的时候,可能需要远程调用银联提供的 API;查询某个商品的价格,可能需要进行数据库查询。然而,这个被依赖服务的稳定性是不能保证的。如果依赖的服务出现了不稳定的情况,请求的响应时间变长,那么调用服务的方法的响应时间也会变长,线程会产生堆积,最终可能耗尽业务自身的线程池,服务本身也变得不可用。
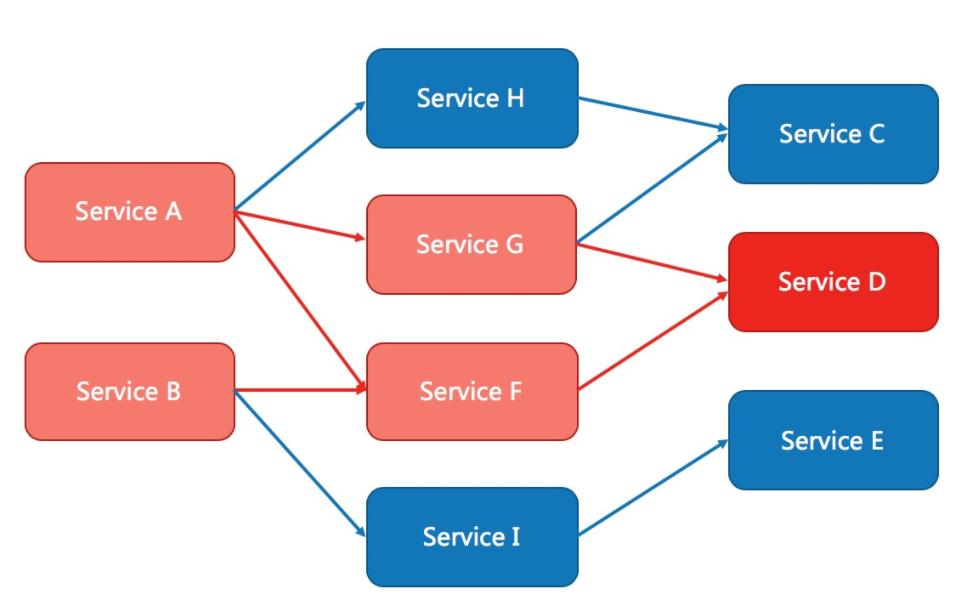
现代微服务架构都是分布式的,由非常多的服务组成。不同服务之间相互调用,组成复杂的调用链路。以上的问题在链路调用中会产生放大的效果。复杂链路上的某一环不稳定,就可能会层层级联,最终导致整个链路都不可用。因此我们需要对不稳定的弱依赖服务调用进行熔断降级,暂时切断不稳定调用,避免局部不稳定因素导致整体的雪崩。熔断降级作为保护自身的手段,通常在客户端(调用端)进行配置。
二、熔断策略 Sentinel 提供以下几种熔断策略:
慢调用比例 (SLOW_REQUEST_RATIO):选择以慢调用比例作为阈值,需要设置允许的慢调用
RT:(即最大的响应时间),请求的响应时间大于该值则统计为慢调用。当单位统计时长(statIntervalMs)内请求数目大于设置的最小请求数目,并且慢调用的比例大于阈值,则接下来的熔断时长内请求会自动被熔断。经过熔断时长后熔断器会进入探测恢复状态(HALF-OPEN 状态),若接下来的一个请求响应时间小于设置的慢调用 RT 则结束熔断,若大于设置的慢调用 RT 则会再次被熔断。 异常比例: (ERROR_RATIO):当单位统计时长(statIntervalMs)内请求数目大于设置的最小请求数目,并且异常的比例大于阈值,则接下来的熔断时长内请求会自动被熔断。经过熔断时长后熔断器会进入探测恢复状态(HALF-OPEN 状态),若接下来的一个请求成功完成(没有错误)则结束熔断,否则会再次被熔断。异常比率的阈值范围是 [0.0, 1.0],代表 0% - 100%。 异常数: (ERROR_COUNT):当单位统计时长内的异常数目超过阈值之后会自动进行熔断。经过熔断时长后熔断器会进入探测恢复状态(HALF-OPEN 状态),若接下来的一个请求成功完成(没有错误)则结束熔断,否则会再次被熔断。 注意异常降级仅针对业务异常,对 Sentinel 限流降级本身的异常(BlockException)不生效。
注意:以上是针对 Sentinel 1.8.0 及以上版本。1.8.0 版本对熔断降级特性进行了全新的改进升级,由于我们使用的是1.7.0版本,所以可能稍微有一点点区别,比如1.7.0版本RT策略最小请求数目不支持设置,默认为5个请求等,这些在新版本都可以进行设置,更加灵活。
Sentinel熔断降级会在调用链路中某个资源出现不稳当状态时(例如调用超时或者异常比例升高),对这个资源的调用进行限制,让请求快速失败,避免影响到其他的资源而导致级联错误。
当资源被降级后, 在接下来的降级时间窗口之内,对该资源的调用都会自动熔断(默认行为是抛出DegradeException)。
Sentinel降级-RT
RT: 平均响应时间 (DEGRADE_GRADE_RT):当 1s 内持续进入 N 个请求,对应时刻的平均响应时间(秒级)均超过阈值(count,以 ms 为单位),那么在接下的时间窗口(DegradeRule 中的 timeWindow,以 s 为单位)之内,对这个方法的调用都会自动地熔断(抛出 DegradeException)。注意 Sentinel 默认统计的 RT 上限是 4900 ms,超出此阈值的都会算作 4900 ms,若需要变更此上限可以通过启动配置项 -Dcsp.sentinel.statistic.max.rt=xxx 来配置。
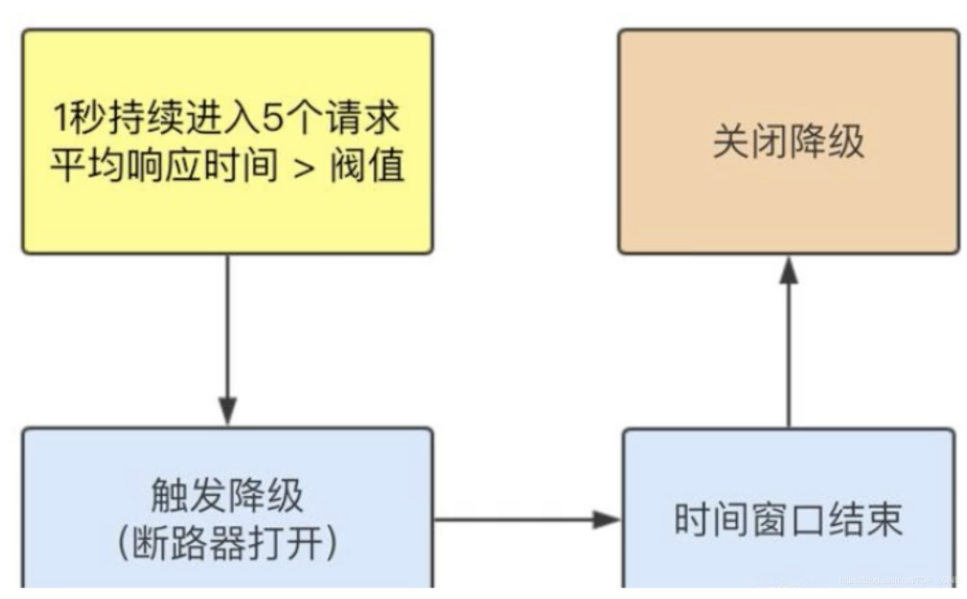
上图表示 需要1s持续进入5个请求,并且 平均响应时间大于 阈值,才会触发降级,打开断路器,等时间窗口结束,再关闭降级
1、添加testD接口,接口中设置1秒睡眠时间,即模拟响应时间为1s
    @GetMapping("/testD")
    public String testD()
    {
        try { TimeUnit.SECONDS.sleep(1); } catch (InterruptedException e) { e.printStackTrace(); }
        log.info("testD 测试RT");
        return "------testD";
    }
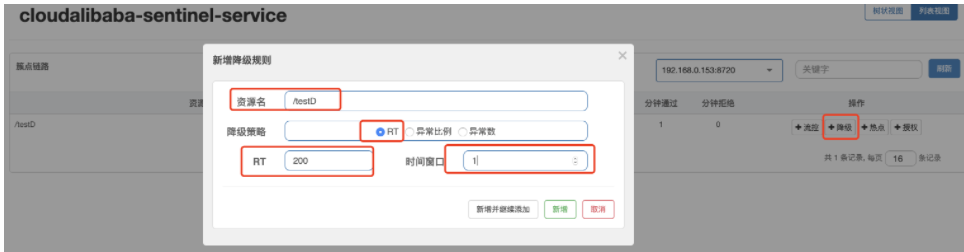
2、Sentinel-dashboard中进行接口testD的RT设置,需要先请求一次testD,要不然dashboard中不会出现,设置降级策略为RT,RT值为200毫秒,时间窗口之降级时间间隔为1s,单位是秒
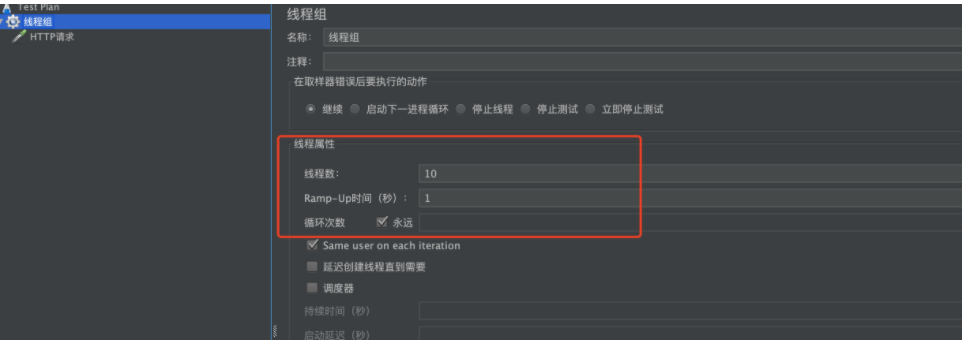
3、通过Jmeter做压力测试,设置请求testD接口,1秒内10个线程请求,永远循环
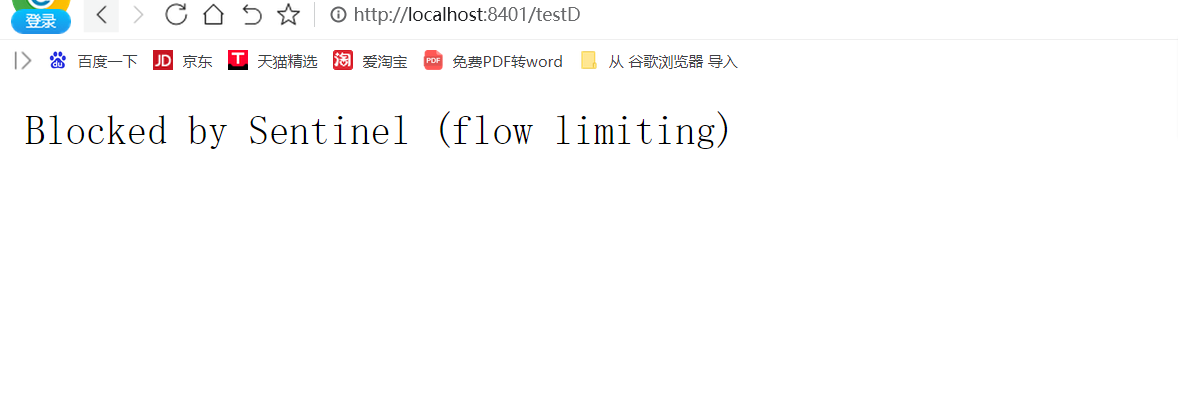
4、先请求一次testD接口没问题,再开启Jmeter压测,再浏览器请求一次testD发现已经快速失败了
5、测试结果表明RT策略成功,因为一秒10个线程请求满足了 RT的一秒5个请求,然后testD休眠1s满足了RT策略里的200ms阈值,所以能测试成功。
永远一秒钟打进来10个线程(大于5个了)调用testD,我们希望200毫秒处理完本次任务, 如果超过200毫秒还没处理完,在未来1秒钟的时间窗口内,断路器打开(保险丝跳闸)微服务不可用,保险丝跳闸断电了。后续我停止jmeter,没有这么大的访问量了,断路器关闭(保险丝恢复),微服务恢复OK
异常比例
异常比例 (DEGRADE_GRADE_EXCEPTION_RATIO):当资源的每秒请求量 >= N(可配置),并且每秒异常总数占通过量的比值超过阈值(DegradeRule 中的 count)之后,资源进入降级状态,即在接下的时间窗口(DegradeRule 中的 timeWindow,以 s 为单位)之内,对这个方法的调用都会自动地返回。异常比率的阈值范围是 [0.0, 1.0],代表 0% - 100%。
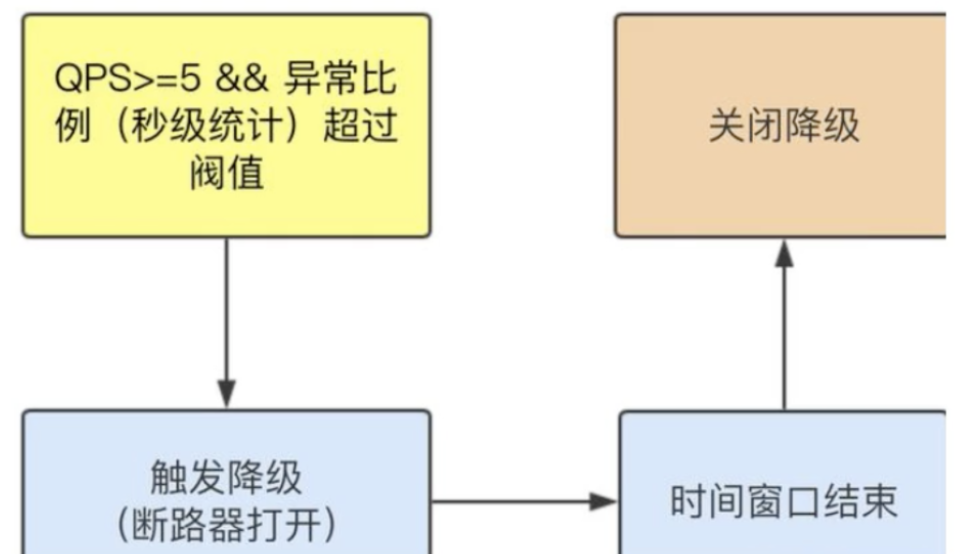
上图表示 QPS>=5 且异常比例超过阈值,触发降级,打开断路器,等时间窗口结束,再关闭降级
1、添加testF接口,接口中设置10/0,即模拟运行时异常
@GetMapping("/testF")
public String testF() {
    log.info(Thread.currentThread().getName() + "\t" + "...testF 测试 异常比例");
    int i = 10 / 0;
    return "------test 测试 异常比例";
}
2、Sentinel-dashboard中进行接口testD的 异常比例 设置,设置降级策略为 异常比例 ,异常比例为0.2即20%,时间窗口为3s
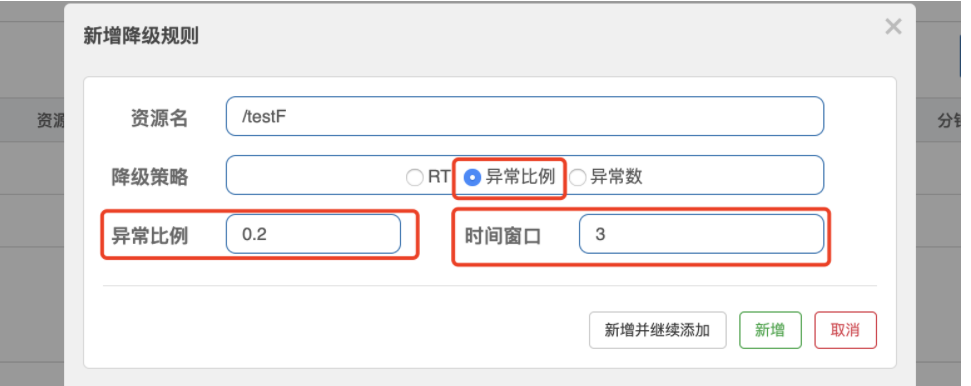
3、通过Jmeter进行压测,设置请求testF接口,1秒内10个线程请求,永远循环
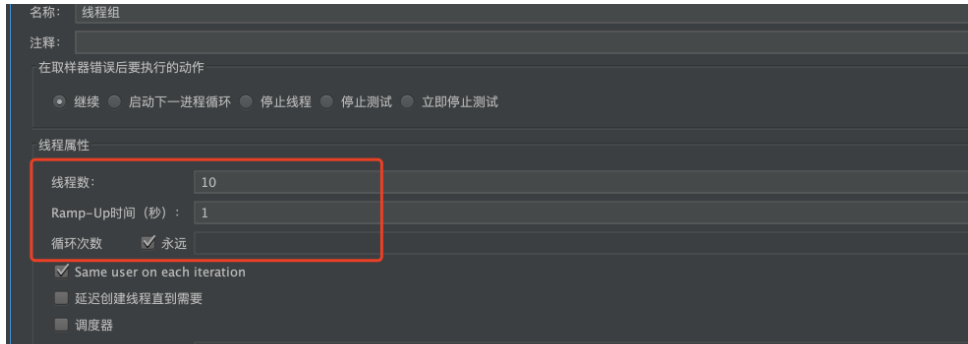
4、先请求一次testF接口,会报by zero异常,当开启Jmeter压测后,再访问testF会快速失败,等关闭Jmeter后,再请求接口,又会报by zero异常

5、按照上述配置,单独访问一次,必然来一次报错一次(int age = 10/0), 调一次错一次;
开启jmeter后,直接高并发发送请求,多次调用达到我们的配置条件了。断路器开启(保险丝跳闸),微服务不可用了,不再报错error而是服务降级了。等关闭jmeter后,又恢复了,所以又请求一次报错一次
异常数
异常数 (DEGRADE_GRADE_EXCEPTION_COUNT):当资源近 1 分钟的异常数目超过阈值之后会进行熔断。注意由于统计时间窗口是分钟级别的,若 timeWindow 小于 60s,则结束熔断状态后仍可能再进入熔断状态。
异常数是按分钟来统计的,所以时间窗口必须大于等于60s
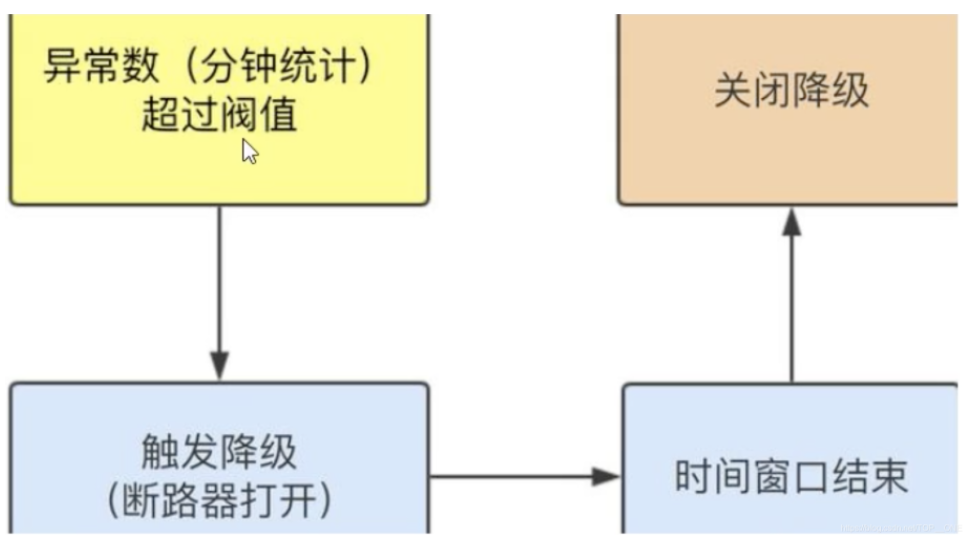
上图就是表示,在一分钟内统计异常数超过阈值了,然后出发降级,打开断路器,等时间长款结束,关闭降级
1、添加testE接口,接口中设置10/0,即模拟运行时异常
    @GetMapping("/testE")
    public String testE() {
        log.info(Thread.currentThread().getName() + "\t" + "...testE 测试 异常数");
        int i = 10 / 0;
        return "------testE 测试 异常数";

    }
2、在sentinel-dashboard中设置testE的降级策略为异常数,异常数为5,时间窗口为70s

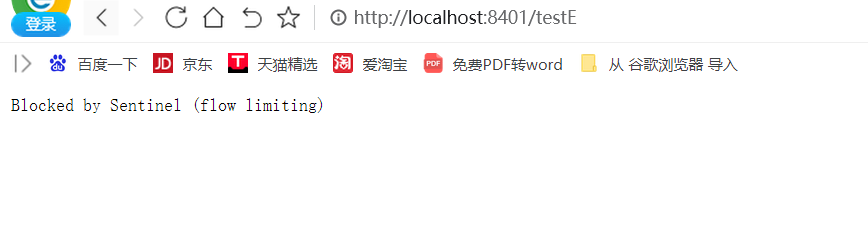
3、请求接口testE,请求一次为by zero异常,请求两次也是报错,等请求到五次后就会出现服务降级,直接快速失败,等超过70s窗口期后,再请求testE,又会开始 异常数策略统计
Sentinel热点Key限流
何为热点?热点即经常访问的数据。很多时候我们希望统计某个热点数据中访问频次最高的 Top K 数据,并对其访问进行限制。比如:
- 商品 ID 为参数,统计一段时间内最常购买的商品 ID 并进行限制
- 用户 ID 为参数,针对一段时间内频繁访问的用户 ID 进行限制
热点参数限流会统计传入参数中的热点参数,并根据配置的限流阈值与模式,对包含热点参数的资源调用进行限流。 热点参数限流可以看做是一种特殊的流量控制,仅对包含热点参数的资源调用生效。
兜底的方法:
- 系统默认的方法
- 客户自定义的方法 之前的case,限流出问题后,都是用sentinel系统默认的提示:Blocked by Sentinel (flow limiting)
那么我们能不能自定?类似Hystrix,某个方法出问题了,就找对应的兜底降级方法?
从HystrixCommond到@SentinelResource
@GetMapping("/testHotKey")
@SentinelResource(value = "testHotKey",blockHandler = "deal_testHotKey")//value = "testHotKey" 自定义的名字也可以时其他的名称
public String testHotKey(//blockHandler = "deal_testHotKey"  对应下面的 deal_testHotKey
        @RequestParam(value = "p1",required = false) String p1,
        @RequestParam(value = "p2",required = false) String p2){
    return "-------testHotKey";
}
//key限流提示
public String deal_testHotKey(String p1,String p2,BlockException exception){
    return "-----------deal_testHotKey:错误";   //sentinel系统默认提示:Blocked by Sentinel (flow limiting)
}
Sentinel热点参数限流
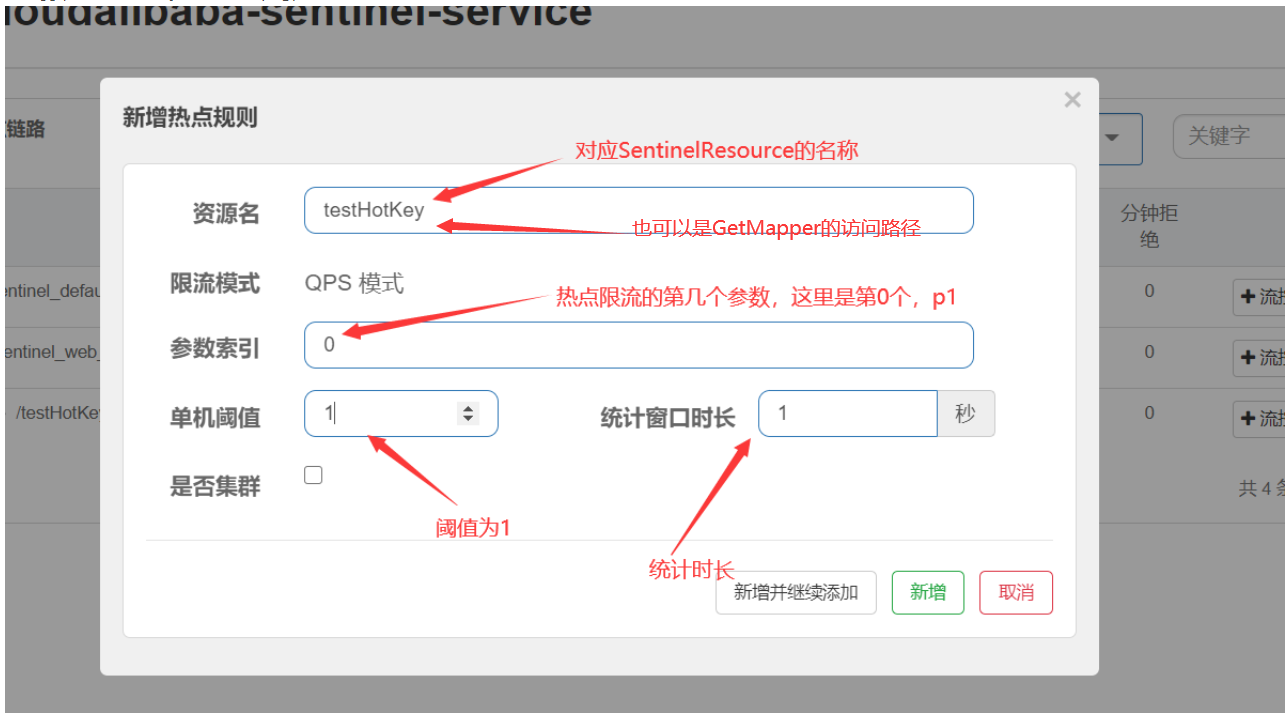
浏览器访问测试
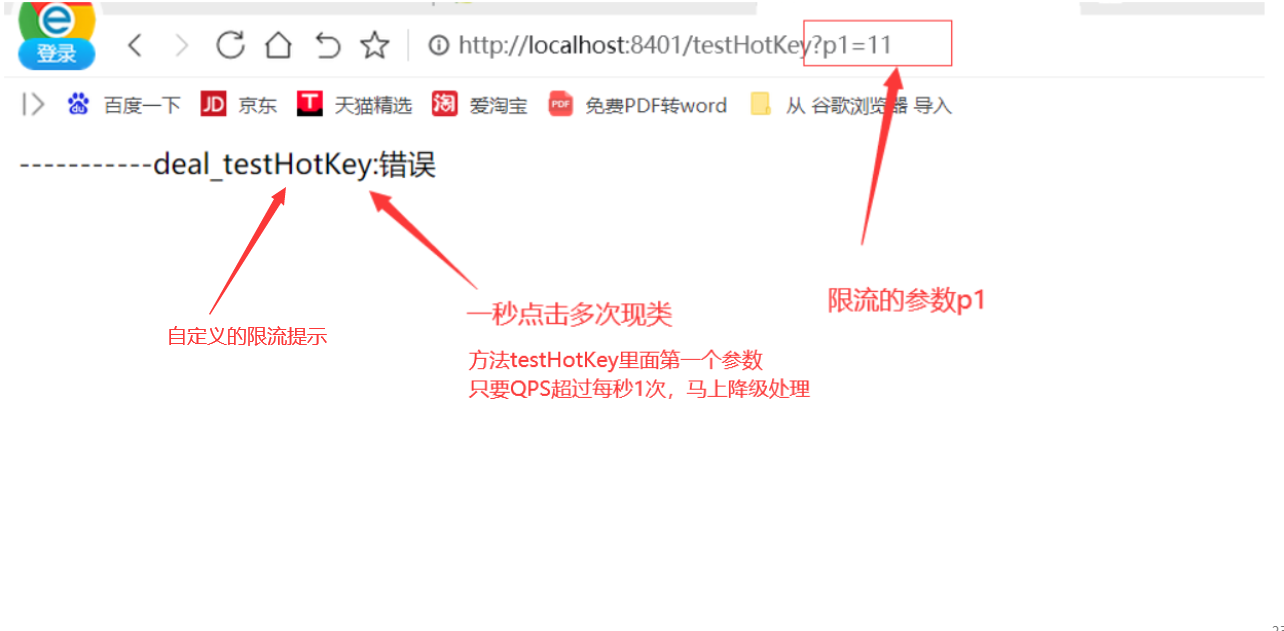
参数例外项
上述案例在访问超过1秒1个后马上被限流。但是,我们希望p1参数当它时某个特殊值时,它的限流值和平时不一样。 比如:当p1=5时,它的阈值可以达到200;其它值仍然为1
举个例子,当一个数小于5的时候对他进行限制,如果大于5的时候不对他进行限制。就是这个意思。
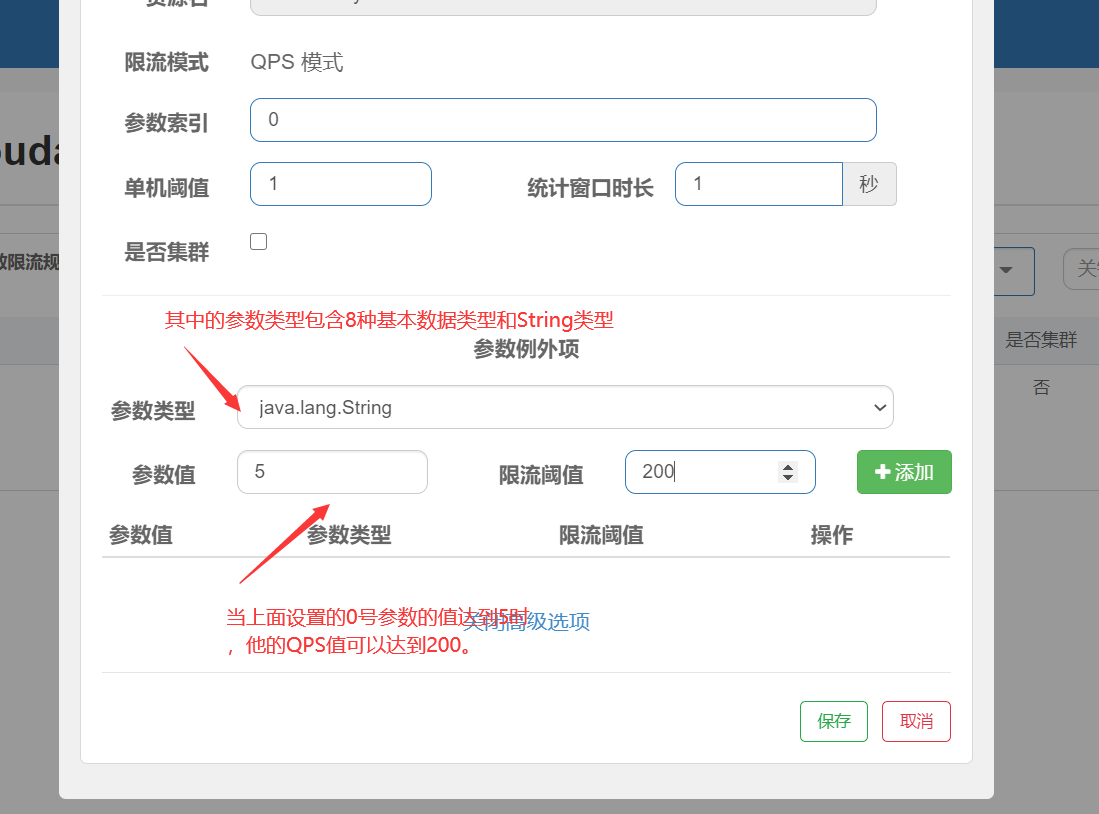
当p1等于5的时候,阈值变为200
当p1不等于5的时候,阈值就是平常的1
热点参数的注意点,参数必须是基本类型或者String
浏览器访问
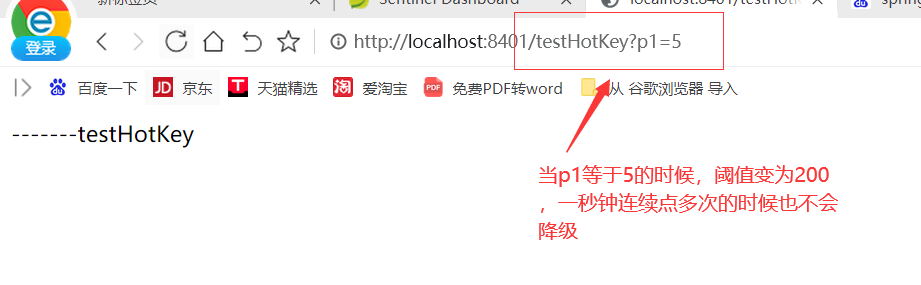
注意:
@SentinelResource处理的是Sentinel控制台配置的违规情况,有blockHandler方法配置的兜底处理; 如果逻辑代码中出现其它RuntimeException,@SentinelResource是不管的。
Sentinel系统规则
系统自适应限流
Sentinel 系统自适应限流从整体维度对应用入口流量进行控制,结合应用的 Load、CPU 使用率、总体平均 RT、入口 QPS 和并发线程数等几个维度的监控指标,通过自适应的流控策略,让系统的入口流量和系统的负载达到一个平衡,让系统尽可能跑在最大吞吐量的同时保证系统整体的稳定性。
系统规则
系统保护规则是从应用级别的入口流量进行控制,从单台机器的 load、CPU 使用率、平均 RT、入口 QPS 和并发线程数等几个维度监控应用指标,让系统尽可能跑在最大吞吐量的同时保证系统整体的稳定性。
系统保护规则是应用整体维度的,而不是资源维度的,并且仅对入口流量生效。入口流量指的是进入应用的流量(EntryType.IN),比如 Web 服务或 Dubbo 服务端接收的请求,都属于入口流量。
系统规则支持以下的模式:
- Load 自适应(仅对 Linux/Unix-like 机器生效):系统的 load1 作为启发指标,进行自适应系统保护。当系统 load1 超过设定的启发值,且系统当前的并发线程数超过估算的系统容量时才会触发系统保护(BBR 阶段)。系统容量由系统的
maxQps * minRt估算得出。设定参考值一般是CPU cores * 2.5。 - CPU usage(1.5.0+ 版本):当系统 CPU 使用率超过阈值即触发系统保护(取值范围 0.0-1.0),比较灵敏。
- 平均 RT:当单台机器上所有入口流量的平均 RT 达到阈值即触发系统保护,单位是毫秒。
- 并发线程数:当单台机器上所有入口流量的并发线程数达到阈值即触发系统保护。
- 入口 QPS:当单台机器上所有入口流量的 QPS 达到阈值即触发系统保护。
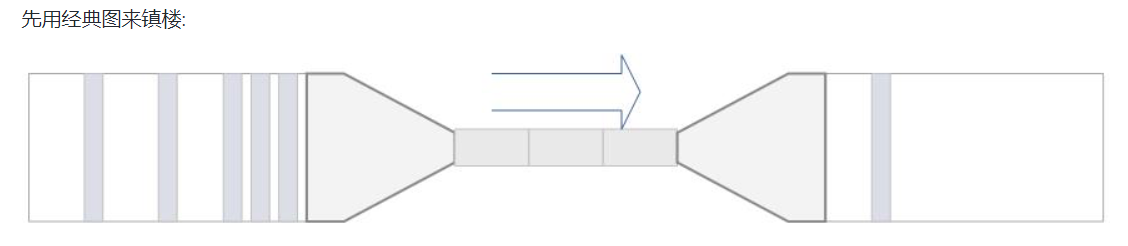
我们把系统处理请求的过程想象为一个水管,到来的请求是往这个水管灌水,当系统处理顺畅的时候,请求不需要排队,直接从水管中穿过,这个请求的RT是最短的;反之,当请求堆积的时候,那么处理请求的时间则会变为:排队时间 + 最短处理时间。
- 推论一: 如果我们能够保证水管里的水量,能够让水顺畅的流动,则不会增加排队的请求;也就是说,这个时候的系统负载不会进一步恶化。
我们用 T 来表示(水管内部的水量),用RT来表示请求的处理时间,用P来表示进来的请求数,那么一个请求从进入水管道到从水管出来,这个水管会存在 P * RT 个请求。换一句话来说,当 T ≈ QPS * Avg(RT) 的时候,我们可以认为系统的处理能力和允许进入的请求个数达到了平衡,系统的负载不会进一步恶化。
接下来的问题是,水管的水位是可以达到了一个平衡点,但是这个平衡点只能保证水管的水位不再继续增高,但是还面临一个问题,就是在达到平衡点之前,这个水管里已经堆积了多少水。如果之前水管的水已经在一个量级了,那么这个时候系统允许通过的水量可能只能缓慢通过,RT会大,之前堆积在水管里的水会滞留;反之,如果之前的水管水位偏低,那么又会浪费了系统的处理能力。
- 推论二: 当保持入口的流量是水管出来的流量的最大的值的时候,可以最大利用水管的处理能力。
然而,和 TCP BBR 的不一样的地方在于,还需要用一个系统负载的值(load1)来激发这套机制启动。
注:这种系统自适应算法对于低 load 的请求,它的效果是一个“兜底”的角色。对于不是应用本身造成的 load 高的情况(如其它进程导致的不稳定的情况),效果不明显。
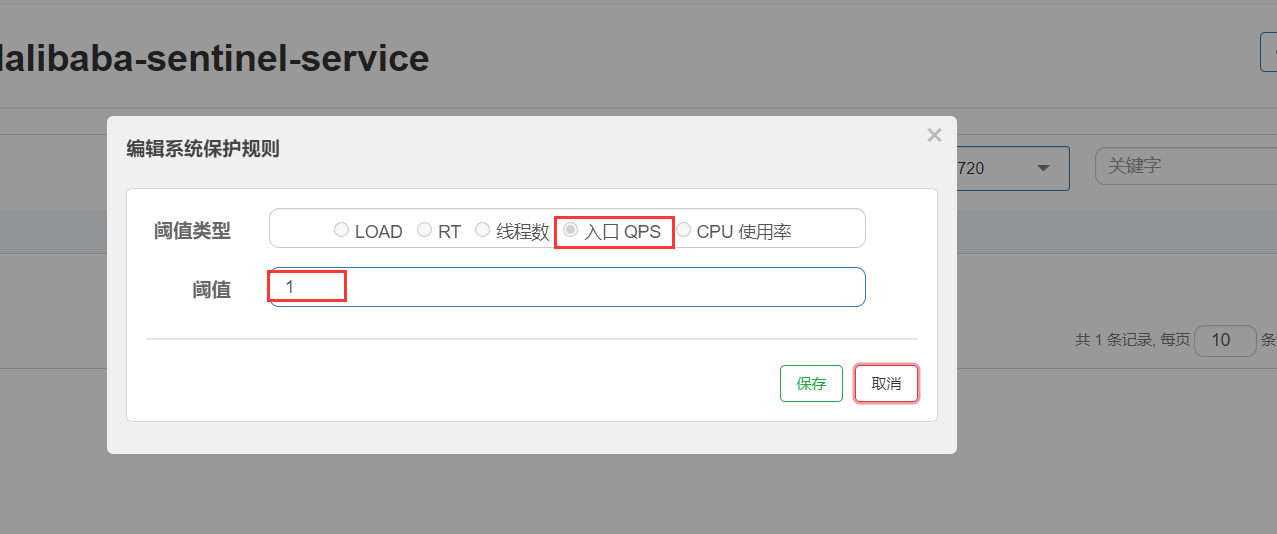
设置QPS
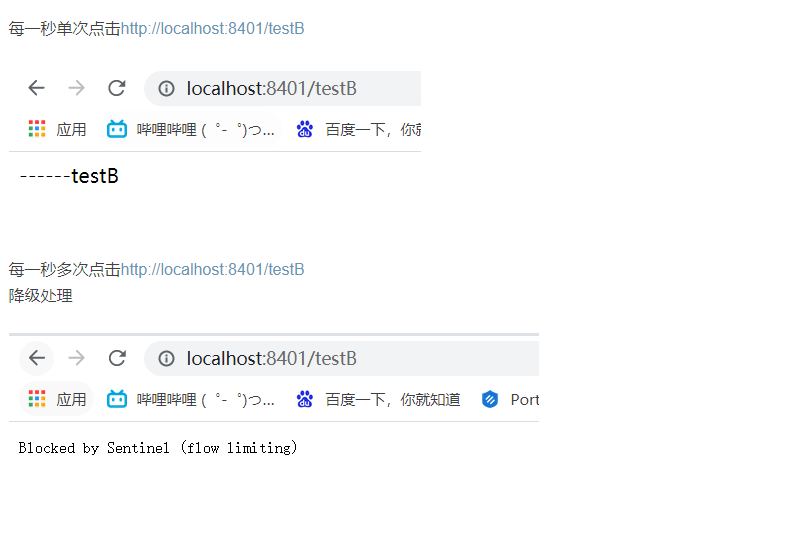
测试
SentinelResource配置
新建一个cloud-api-commons模块作为一个工具类
导入依赖
<dependencies>
    <dependency>
        <groupId>org.springframework.boot</groupId>
        <artifactId>spring-boot-devtools</artifactId>
        <scope>runtime</scope>
        <optional>true</optional>
    </dependency>
    <dependency>
        <groupId>org.projectlombok</groupId>
        <artifactId>lombok</artifactId>
        <optional>true</optional>
    </dependency>
    <dependency>
        <groupId>cn.hutool</groupId>
        <artifactId>hutool-all</artifactId>
        <version>5.1.0</version>
    </dependency>
</dependencies>
CommonResult
package com.cloudapicommons.entities;
import lombok.AllArgsConstructor;
import lombok.Data;
import lombok.NoArgsConstructor;

@Data
@AllArgsConstructor
@NoArgsConstructor
public class CommonResult<T>
{
    private Integer code;
    private String  message;
    private T       data;

    public CommonResult(Integer code,String message)
    {
        this(code,message,null);
    }
}
Payment
package com.cloudapicommons.entities;

import lombok.AllArgsConstructor;
import lombok.Data;
import lombok.NoArgsConstructor;

import java.io.Serializable;

@Data
@AllArgsConstructor
@NoArgsConstructor
public class Payment implements Serializable
{
    private Long id;
    private String serial;
}
在8401模块下controller下新建一个类
@RestController
public class RateLimitController
{
    @GetMapping("/byResource")
    @SentinelResource(value = "byResource",blockHandler = "handleException")
    public CommonResult byResource()
    {
        return new CommonResult(200,"按资源名称限流测试OK",new Payment(2020L,"serial001"));
    }


    public CommonResult handleException(BlockException exception)
    {
        return new CommonResult(444,exception.getClass().getCanonicalName()+"\t 服务不可用");

    }
}
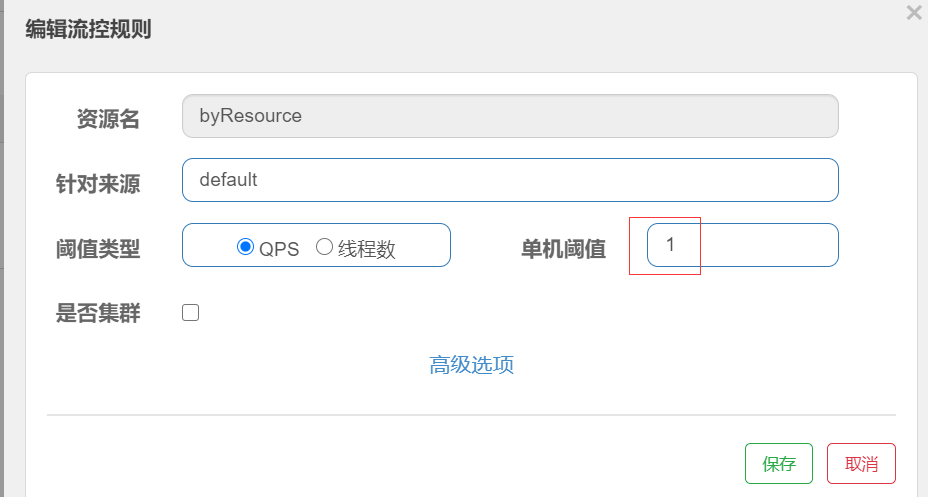
浏览器测试
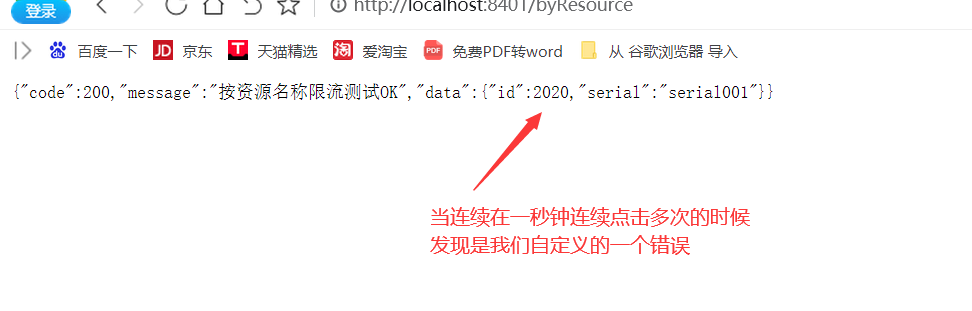
在RateLimitController添加
@GetMapping("/rateLimit/byUrl")
@SentinelResource(value = "byUrl")
public CommonResult byUrl()
{
    return new CommonResult(200,"按url限流测试OK",new Payment(2020L,"serial002"));
}
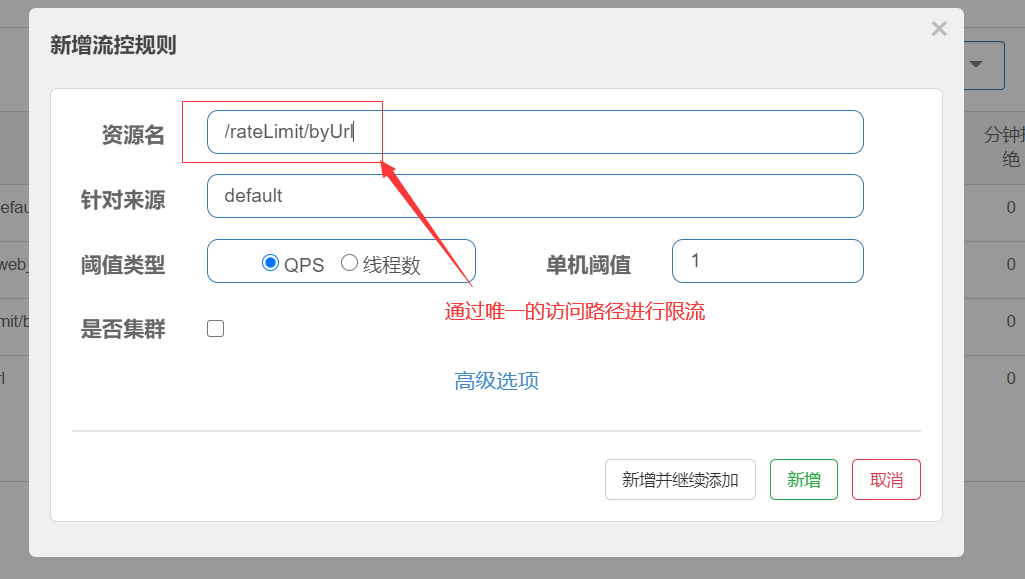
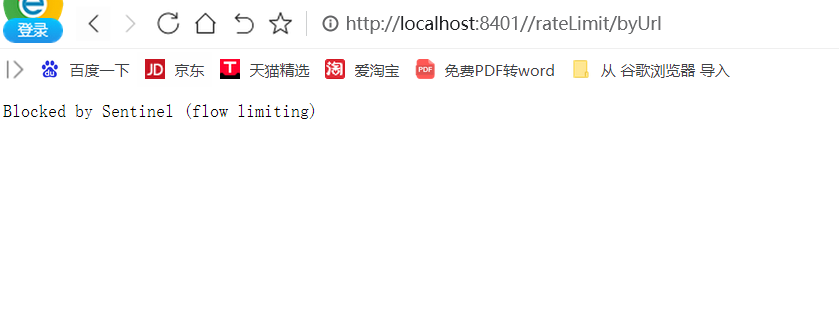
浏览器测试
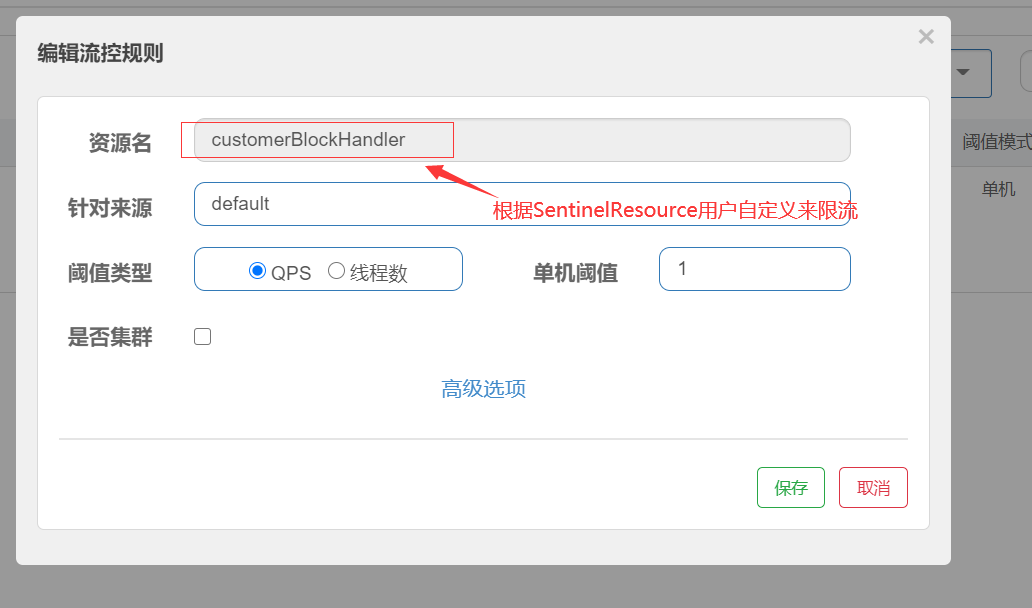
根据用自定义的来限流
新建一个CustomerBlockHandler类用户自定义
package com.cloudalibabasentinelservice8401.myhandler;

import com.alibaba.csp.sentinel.slots.block.BlockException;
import com.cloudapicommons.entities.CommonResult;

public class CustomerBlockHandler
{
    public static CommonResult handlerException(BlockException exception)
    {
        return new CommonResult(4444,"按客戶自定义,global handlerException----1");
    }
    public static CommonResult handlerException2(BlockException exception)
    {
        return new CommonResult(4444,"按客戶自定义,global handlerException----2");
    }
}
在RateLimitController添加
@GetMapping("/rateLimit/customerBlockHandler")
@SentinelResource(value = "customerBlockHandler",
        blockHandlerClass = CustomerBlockHandler.class,
        blockHandler = "handlerException2")
public CommonResult customerBlockHandler()
{
    return new CommonResult(200,"按客戶自定义",new Payment(2020L,"serial003"));
}
浏览器测试
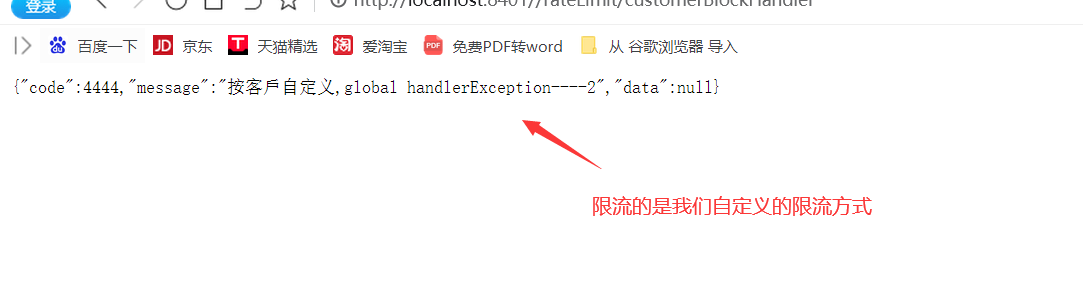
也可是使用Java的方式来进行配置耦合性过高,不建议配置
public static void main(String[] args) {
    initFlowRules();
    while (true) {
        Entry entry = null;
        try {
	    entry = SphU.entry("HelloWorld");
            /*您的业务逻辑 - 开始*/
            System.out.println("hello world");
            /*您的业务逻辑 - 结束*/
	} catch (BlockException e1) {
            /*流控逻辑处理 - 开始*/
	    System.out.println("block!");
            /*流控逻辑处理 - 结束*/
	} finally {
	   if (entry != null) {
	       entry.exit();
	   }
	}
    }
}
Sentinel服务熔断Ribbon和feign服务熔断
搭建环境服务提供者9004和9004
9003和9004导入依赖
    <dependencies>
        <!--SpringCloud ailibaba nacos -->
        <dependency>
            <groupId>com.alibaba.cloud</groupId>
            <artifactId>spring-cloud-starter-alibaba-nacos-discovery</artifactId>
        </dependency>
        <!--自定义的api-->
        <dependency>
            <groupId>com.cloud-api-commons</groupId>
            <artifactId>cloud-api-commons</artifactId>
            <version>0.0.1-SNAPSHOT</version>
        </dependency>
        <!-- SpringBoot整合Web组件 -->
        <dependency>
            <groupId>org.springframework.boot</groupId>
            <artifactId>spring-boot-starter-web</artifactId>
        </dependency>
        <dependency>
            <groupId>org.springframework.boot</groupId>
            <artifactId>spring-boot-starter-actuator</artifactId>
        </dependency>
        <!--日常通用jar包配置-->
        <dependency>
            <groupId>org.springframework.boot</groupId>
            <artifactId>spring-boot-devtools</artifactId>
            <scope>runtime</scope>
            <optional>true</optional>
        </dependency>
        <dependency>
            <groupId>org.projectlombok</groupId>
            <artifactId>lombok</artifactId>
            <optional>true</optional>
        </dependency>
        <dependency>
            <groupId>org.springframework.boot</groupId>
            <artifactId>spring-boot-starter-test</artifactId>
            <scope>test</scope>
        </dependency>
    </dependencies>
9003模块服务提供者
application.yml
server:
  port: 9003

spring:
  application:
    name: nacos-payment-provider
  cloud:
    nacos:
      discovery:
        server-addr: localhost:8848 #配置Nacos地址

management:
  endpoints:
    web:
      exposure:
        include: '*'
controller
package com.cloudalibabaproviderpayment9003.controller;
import com.cloudapicommons.entities.CommonResult;
import com.cloudapicommons.entities.Payment;
import org.springframework.beans.factory.annotation.Value;
import org.springframework.web.bind.annotation.GetMapping;
import org.springframework.web.bind.annotation.PathVariable;
import org.springframework.web.bind.annotation.RestController;
import java.util.HashMap;

/**
 */
@RestController
public class PaymentController
{
    @Value("${server.port}")
    private String serverPort;

    public static HashMap<Long, Payment> hashMap = new HashMap<>();
    static
    {
        hashMap.put(1L,new Payment(1L,"28a8c1e3bc2742d8848569891fb42181"));
        hashMap.put(2L,new Payment(2L,"bba8c1e3bc2742d8848569891ac32182"));
        hashMap.put(3L,new Payment(3L,"6ua8c1e3bc2742d8848569891xt92183"));
    }

    @GetMapping(value = "/paymentSQL/{id}")
    public CommonResult<Payment> paymentSQL(@PathVariable("id") Long id)
    {
        Payment payment = hashMap.get(id);
        CommonResult<Payment> result = new CommonResult(200,"from mysql,serverPort:  "+serverPort,payment);
        return result;
    }

}
启动类
@SpringBootApplication
@EnableDiscoveryClient
public class CloudalibabaProviderPayment9003Application {

    public static void main(String[] args) {
        SpringApplication.run(CloudalibabaProviderPayment9003Application.class, args);
    }

}
9004模块服务提供者
application.yml
server:
  port: 9004

spring:
  application:
    name: nacos-payment-provider
  cloud:
    nacos:
      discovery:
        server-addr: localhost:8848 #配置Nacos地址

management:
  endpoints:
    web:
      exposure:
        include: '*'
controller
package com.cloudalibabaproviderpayment9004.controller;
import com.cloudapicommons.entities.CommonResult;
import com.cloudapicommons.entities.Payment;
import org.springframework.beans.factory.annotation.Value;
import org.springframework.web.bind.annotation.GetMapping;
import org.springframework.web.bind.annotation.PathVariable;
import org.springframework.web.bind.annotation.RestController;
import java.util.HashMap;

@RestController
public class PaymentController
{
    @Value("${server.port}")
    private String serverPort;

    public static HashMap<Long, Payment> hashMap = new HashMap<>();
    static
    {
        hashMap.put(1L,new Payment(1L,"28a8c1e3bc2742d8848569891fb42181"));
        hashMap.put(2L,new Payment(2L,"bba8c1e3bc2742d8848569891ac32182"));
        hashMap.put(3L,new Payment(3L,"6ua8c1e3bc2742d8848569891xt92183"));
    }

    @GetMapping(value = "/paymentSQL/{id}")
    public CommonResult<Payment> paymentSQL(@PathVariable("id") Long id)
    {
        Payment payment = hashMap.get(id);
        CommonResult<Payment> result = new CommonResult(200,"from mysql,serverPort:  "+serverPort,payment);
        return result;
    }

}
启动类
@SpringBootApplication
@EnableDiscoveryClient
public class CloudalibabaProviderPayment9004Application {

    public static void main(String[] args) {
        SpringApplication.run(CloudalibabaProviderPayment9004Application.class, args);
    }
}
84服务消费者
导入依赖
 <dependencies>
        <!--SpringCloud openfeign -->
        <dependency>
            <groupId>org.springframework.cloud</groupId>
            <artifactId>spring-cloud-starter-openfeign</artifactId>
        </dependency>
        <!--SpringCloud ailibaba nacos -->
        <dependency>
            <groupId>com.alibaba.cloud</groupId>
            <artifactId>spring-cloud-starter-alibaba-nacos-discovery</artifactId>
        </dependency>
        <!--SpringCloud ailibaba sentinel -->
        <dependency>
            <groupId>com.alibaba.cloud</groupId>
            <artifactId>spring-cloud-starter-alibaba-sentinel</artifactId>
        </dependency>
        <!-- 引入自己定义的api通用包,可以使用Payment支付Entity -->
        <dependency>
            <groupId>com.cloud-api-commons</groupId>
            <artifactId>cloud-api-commons</artifactId>
            <version>0.0.1-SNAPSHOT</version>
        </dependency>
        <!-- SpringBoot整合Web组件 -->
        <dependency>
            <groupId>org.springframework.boot</groupId>
            <artifactId>spring-boot-starter-web</artifactId>
        </dependency>
        <dependency>
            <groupId>org.springframework.boot</groupId>
            <artifactId>spring-boot-starter-actuator</artifactId>
        </dependency>
        <!--日常通用jar包配置-->
        <dependency>
            <groupId>org.springframework.boot</groupId>
            <artifactId>spring-boot-devtools</artifactId>
            <scope>runtime</scope>
            <optional>true</optional>
        </dependency>
        <dependency>
            <groupId>org.projectlombok</groupId>
            <artifactId>lombok</artifactId>
            <optional>true</optional>
        </dependency>
        <dependency>
            <groupId>org.springframework.boot</groupId>
            <artifactId>spring-boot-starter-test</artifactId>
            <scope>test</scope>
        </dependency>
    </dependencies>
appliction.yml
server:
  port: 84

spring:
  application:
    name: nacos-order-consumer
  cloud:
    nacos:
      discovery:
        server-addr: localhost:8848
    sentinel:
      transport:
        #配置Sentinel dashboard地址
        dashboard: localhost:8080
        #默认8719端口,假如被占用会自动从8719开始依次+1扫描,直至找到未被占用的端口
        port: 8719

#消费者将要去访问的微服务名称(注册成功进nacos的微服务提供者)
service-url:
  nacos-user-service: http://nacos-payment-provider

# 激活Sentinel对Feign的支持
feign:
  sentinel:
    enabled: true
config
package com.cloudalibabaconsumernacosorder84.config;
import org.springframework.cloud.client.loadbalancer.LoadBalanced;
import org.springframework.context.annotation.Bean;
import org.springframework.context.annotation.Configuration;
import org.springframework.web.client.RestTemplate;

@Configuration
public class ApplicationContextConfig
{
    @Bean
    @LoadBalanced
    public RestTemplate getRestTemplate()
    {
        return new RestTemplate();
    }
}
controller
package com.cloudalibabaconsumernacosorder84.controller;
import com.alibaba.csp.sentinel.annotation.SentinelResource;
import com.alibaba.csp.sentinel.slots.block.BlockException;
import com.cloudalibabaconsumernacosorder84.service.PaymentService;
import com.cloudapicommons.entities.CommonResult;
import com.cloudapicommons.entities.Payment;
import lombok.extern.slf4j.Slf4j;
import org.springframework.web.bind.annotation.GetMapping;
import org.springframework.web.bind.annotation.PathVariable;
import org.springframework.web.bind.annotation.RequestMapping;
import org.springframework.web.bind.annotation.RestController;
import org.springframework.web.client.RestTemplate;
import javax.annotation.Resource;


@RestController
@Slf4j
public class CircleBreakerController
{
    public static final String SERVICE_URL = "http://nacos-payment-provider";

    @Resource
    private RestTemplate restTemplate;

    @RequestMapping("/consumer/fallback/{id}")
    //@SentinelResource(value = "fallback") //没有配置  直接报,非法参数异常....
    //@SentinelResource(value = "fallback",fallback = "handlerFallback") //fallback只负责业务异常
    //@SentinelResource(value = "fallback",blockHandler = "blockHandler") //blockHandler只负责sentinel控制台配置违规
    @SentinelResource(value = "fallback",fallback = "handlerFallback",blockHandler = "blockHandler",
            exceptionsToIgnore = {IllegalArgumentException.class})
    public CommonResult<Payment> fallback(@PathVariable Long id)
    {
        CommonResult<Payment> result = restTemplate.getForObject(SERVICE_URL + "/paymentSQL/"+id,CommonResult.class,id);

        if (id == 4) {
            throw new IllegalArgumentException ("IllegalArgumentException,非法参数异常....");
        }else if (result.getData() == null) {
            throw new NullPointerException ("NullPointerException,该ID没有对应记录,空指针异常");
        }
        return result;
    }
    //本例是fallback
    public CommonResult handlerFallback(@PathVariable  Long id,Throwable e) {
        Payment payment = new Payment(id,"null");
        return new CommonResult<>(444,"兜底异常handlerFallback,exception内容  "+e.getMessage(),payment);
    }
    //本例是blockHandler
    public CommonResult blockHandler(@PathVariable  Long id,BlockException blockException) {
        Payment payment = new Payment(id,"null");
        return new CommonResult<>(445,"blockHandler-sentinel限流,无此流水: blockException  "+blockException.getMessage(),payment);
    }

    //==================OpenFeign 测试地址
    @Resource
    private PaymentService paymentService;

    @GetMapping(value = "/consumer/paymentSQL/{id}")
    public CommonResult<Payment> paymentSQL(@PathVariable("id") Long id)
    {
        return paymentService.paymentSQL(id);
    }
}
PaymentService
package com.cloudalibabaconsumernacosorder84.service;
import com.cloudapicommons.entities.CommonResult;
import com.cloudapicommons.entities.Payment;
import org.springframework.cloud.openfeign.FeignClient;
import org.springframework.web.bind.annotation.GetMapping;
import org.springframework.web.bind.annotation.PathVariable;

/**
 * 服务熔断feign配置
 */
@FeignClient(value = "nacos-payment-provider",fallback = com.cloudalibabaconsumernacosorder84.service.PaymentFallbackService.class)
public interface PaymentService
{
    @GetMapping(value = "/paymentSQL/{id}")
    public CommonResult<Payment> paymentSQL(@PathVariable("id") Long id);
}
PaymentServiceImpl
package com.cloudalibabaconsumernacosorder84.service;
import com.cloudapicommons.entities.CommonResult;
import com.cloudapicommons.entities.Payment;
import org.springframework.stereotype.Component;

/**
 * 服务熔断feign配置
 */
@Component
public class PaymentFallbackService implements PaymentService
{
    @Override
    public CommonResult<Payment> paymentSQL(Long id)
    {
        return new CommonResult<>(44444,"服务降级返回,---PaymentFallbackService",new Payment(id,"errorSerial"));
    }
}
启动类
@SpringBootApplication
@EnableFeignClients
@EnableDiscoveryClient
public class CloudalibabaConsumerNacosOrder84Application {
    public static void main(String[] args) {
        SpringApplication.run(CloudalibabaConsumerNacosOrder84Application.class, args);
    }
}
测试
启动三个模块浏览器测试发现服务是采用的一个轮询的机制


Sentinel直接/consumer/fallback/{id}可以测试,如果测试直接把注解解开即可,未有注释的是比较全面的建议
feign测试:关闭9003或者9004或者两个都关闭浏览器访问已降级

Sentinel持久化规则
一旦我们重启应用,Sentinel规则将消失,生产环境需要将配置规则进行持久化 将限流配置规则持久化进Nacos保存,只要刷新服务某个rest地址,sentinel控制台的流控规则就能看到,只要Nacos里面的配置不删除,针对服务上Sentinel上的流控规则持续有效
<!--SpringCloud ailibaba sentinel-datasource-nacos 后续做持久化用到-->
<dependency>
    <groupId>com.alibaba.csp</groupId>
    <artifactId>sentinel-datasource-nacos</artifactId>
</dependency>
在8401添加
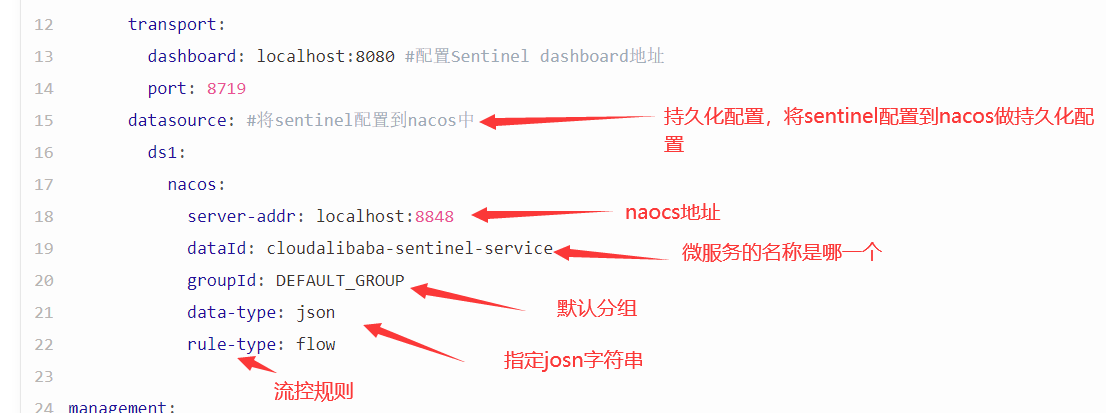
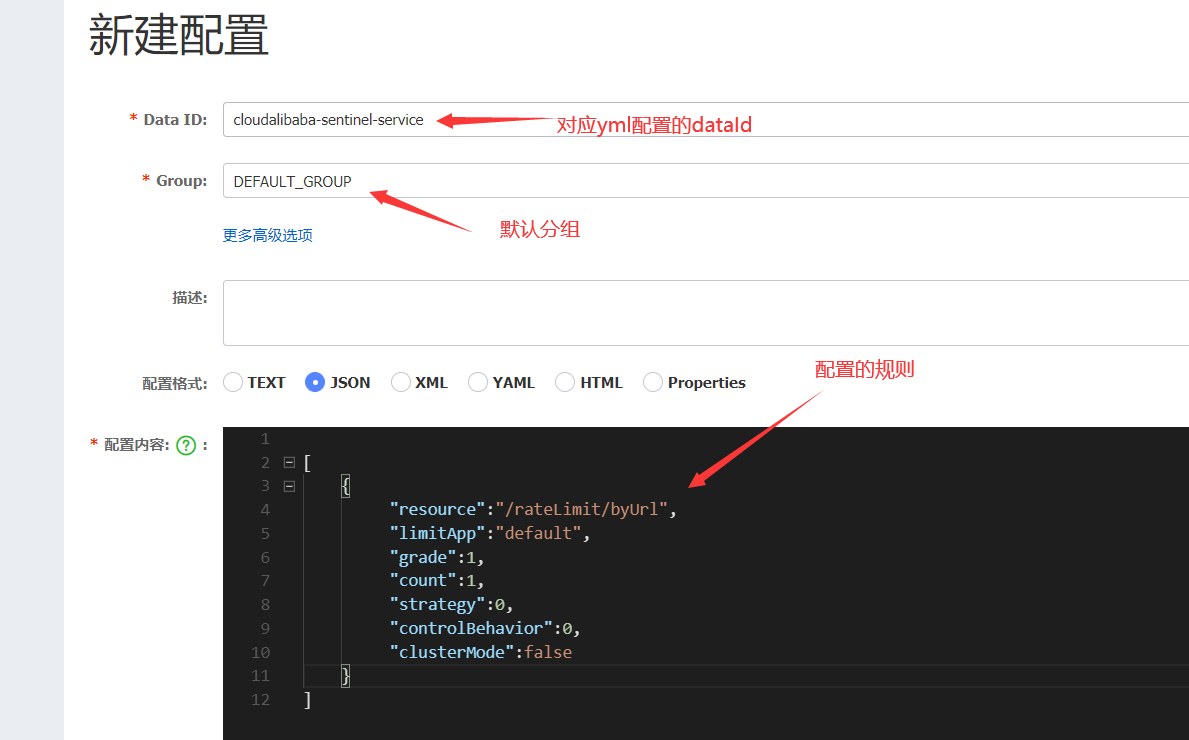
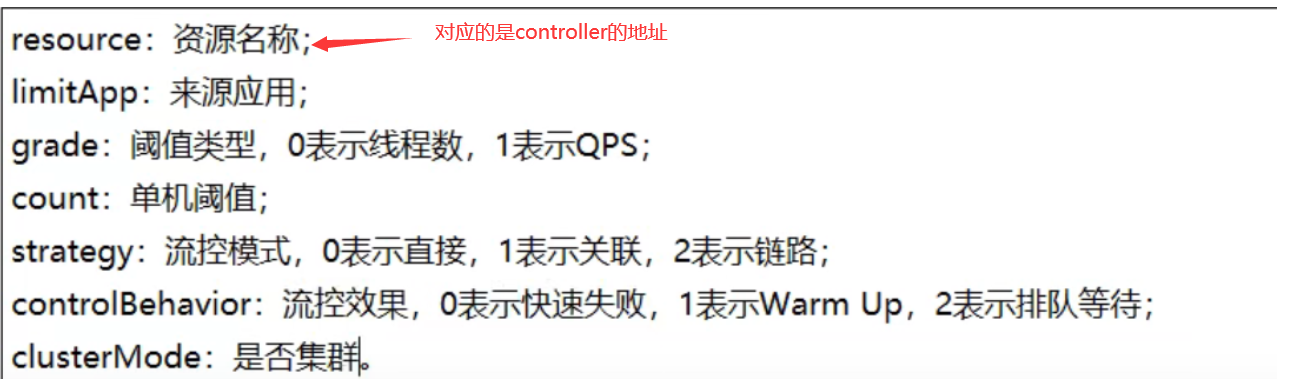
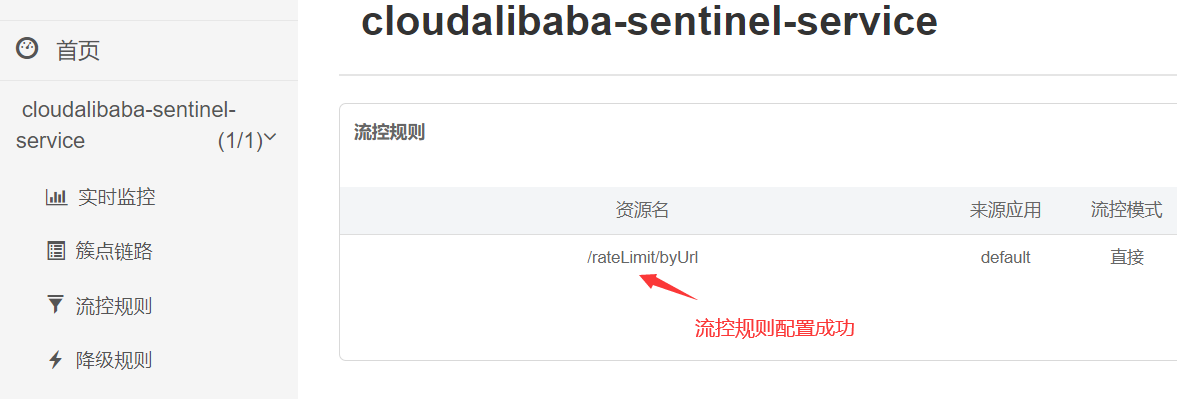
先在浏览器访问一次,在查看sentinel发现持久化配置成功,如果没出来多刷几次
再次访问浏览器,连续点击测试